Virtual Thoughts

Virtualisation, Storage and various other ramblings.

Page 9 of 25

Rancher, vSphere Network Protocol Profiles and static IP addresses for k8s nodes [Updated 2023]

Edit: This post has been updated to reflect changes in newer versions of Rancher.

Note: As mentioned by Jonathan in the comments, disabling cloud-init’s initial network configuration is recommended. To do this, create a file:

/etc/cloud/cloud.cfg.d/99-disable-network-config.cfg

To contain:

network: {config: disabled}

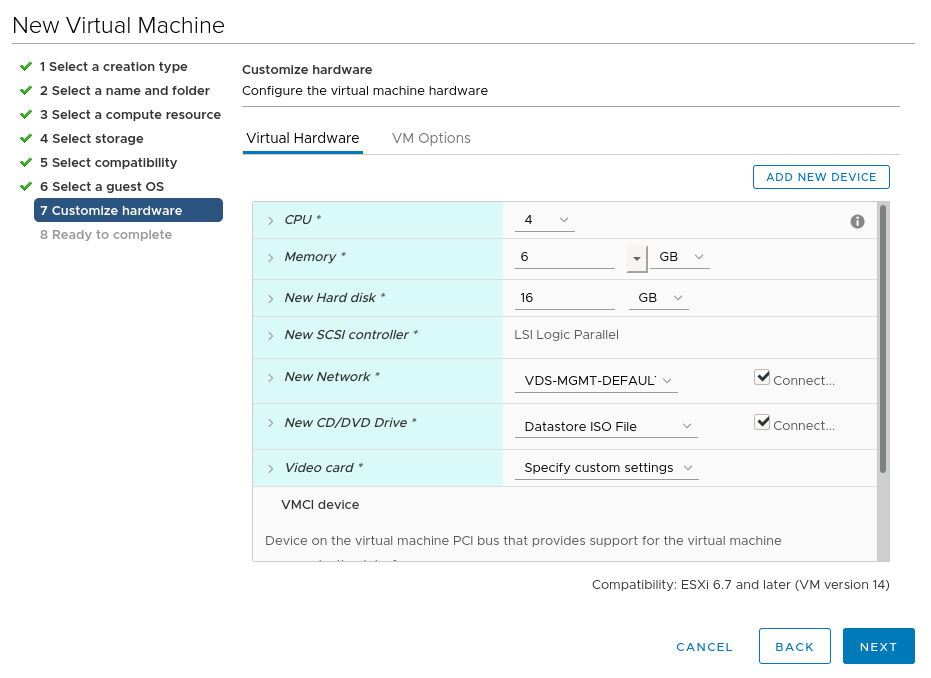
In your VM template.

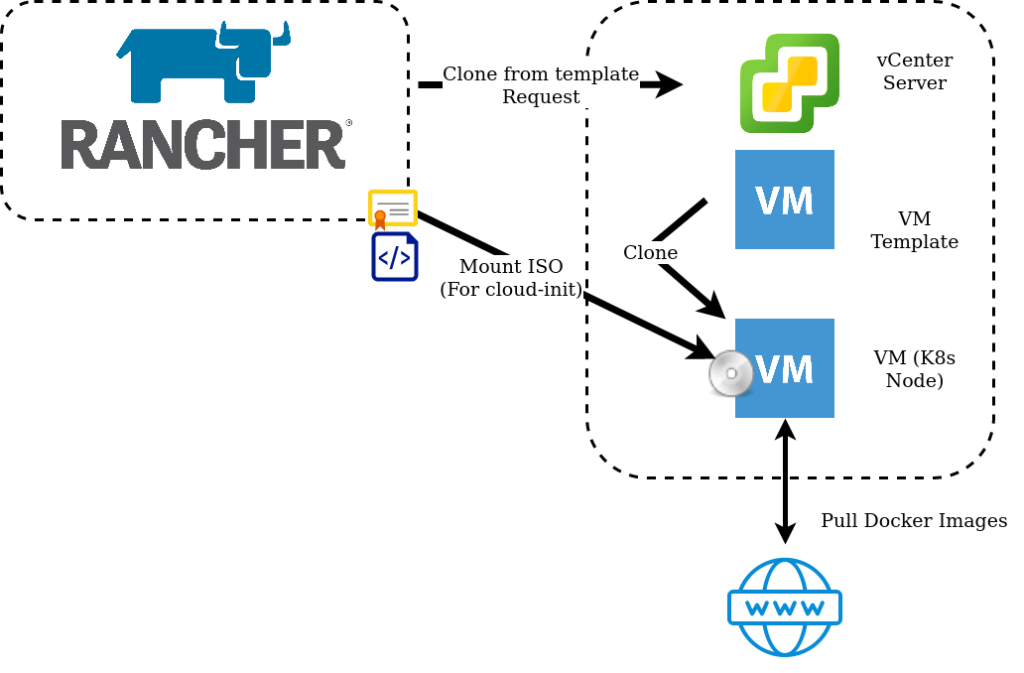
How networking configuration is applied to k8s nodes (or VM’s in general) in on-premises environments is usually achieved by one of two ways – DHCP or static. For some, DHCP is not a popular option and static addresses can be time-consuming to manage, particularly when there’s no IPAM feature in Rancher. In this blog post I go through how to leverage vSphere Network Protocol Profiles in conjunction with Rancher and Cloud-Init to reliably, and predictably apply static IP addresses to deployed nodes.

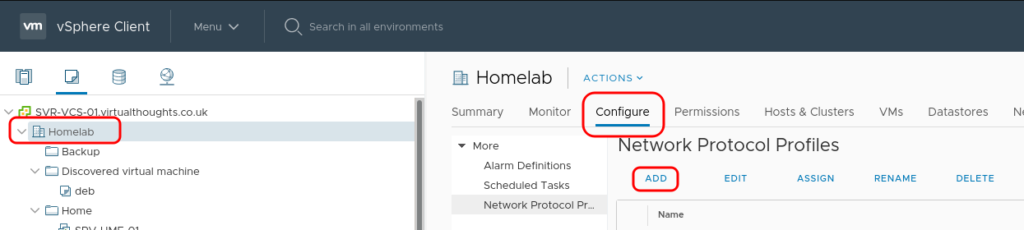
Create the vSphere Network Protocol Profile

Navigate to Datacenter > Configure > Network Protocol Profiles. and click “Add”.

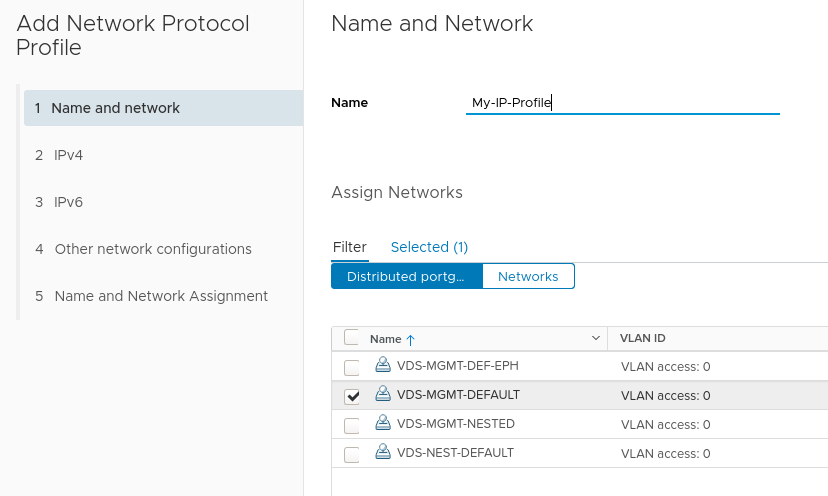
Provide a name for the profile and assign it to one, or a number of port groups.

Next define the network parameters for this port group. The IP Pool and IP Pool Range are of particular importance here – we will use this pool of addresses to assign to our Rancher deployed K8s nodes.

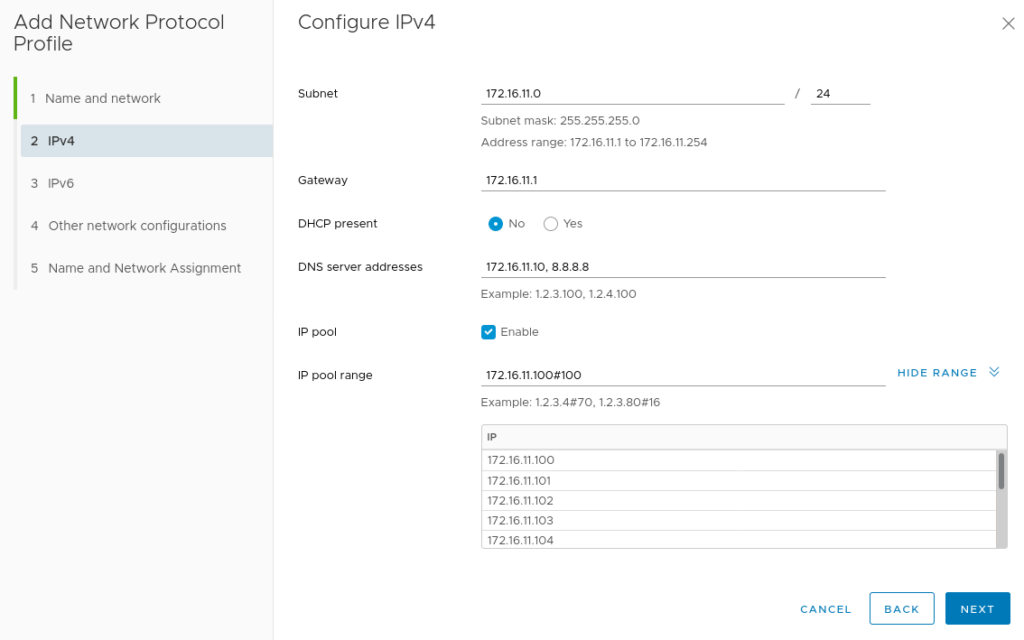
After adding any other network configuration items the profile will be created and associated with the previously specified port group.
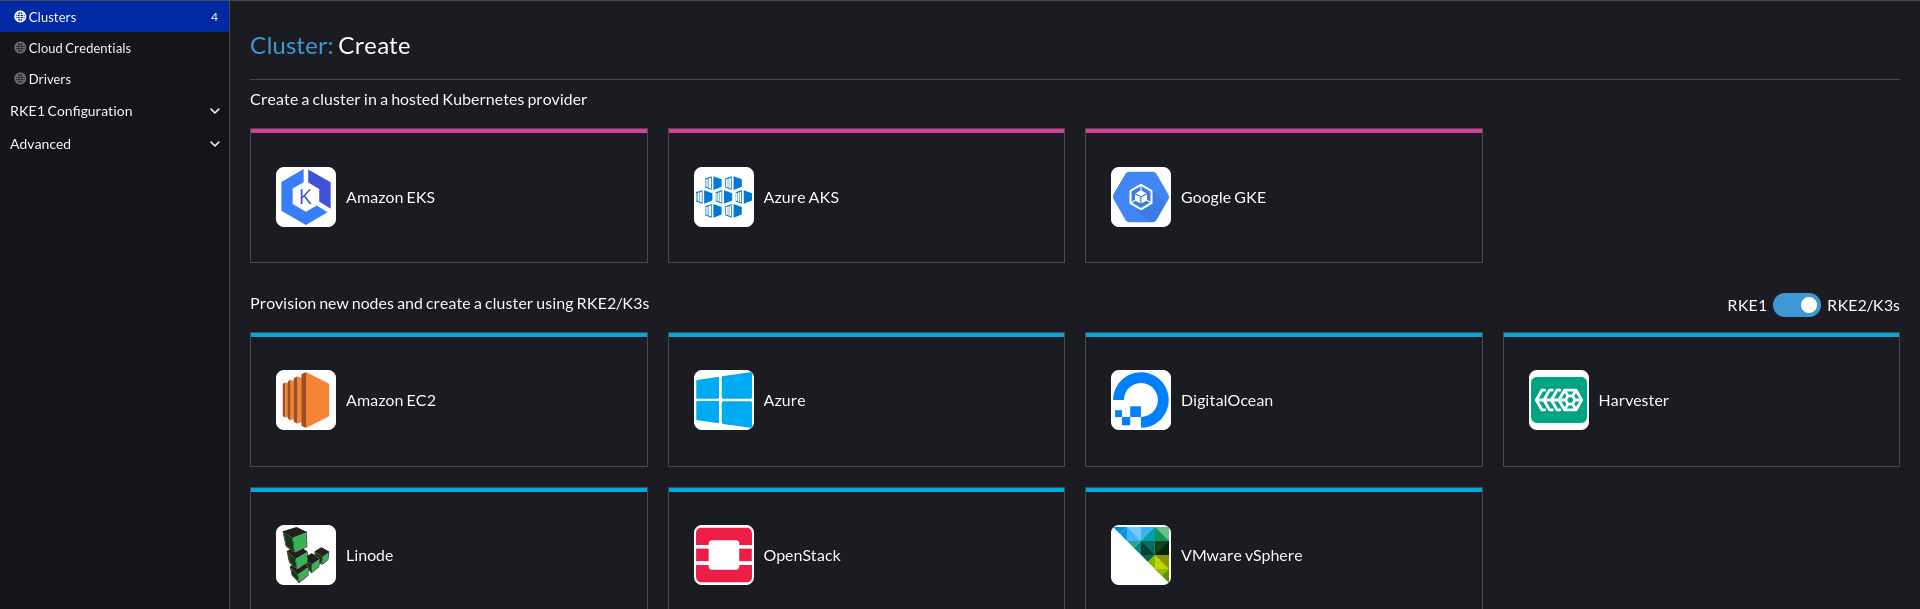
Create a cluster

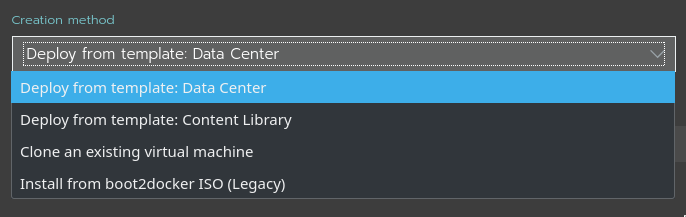
In Rancher, navigate to Cluster Management > Create > vSphere

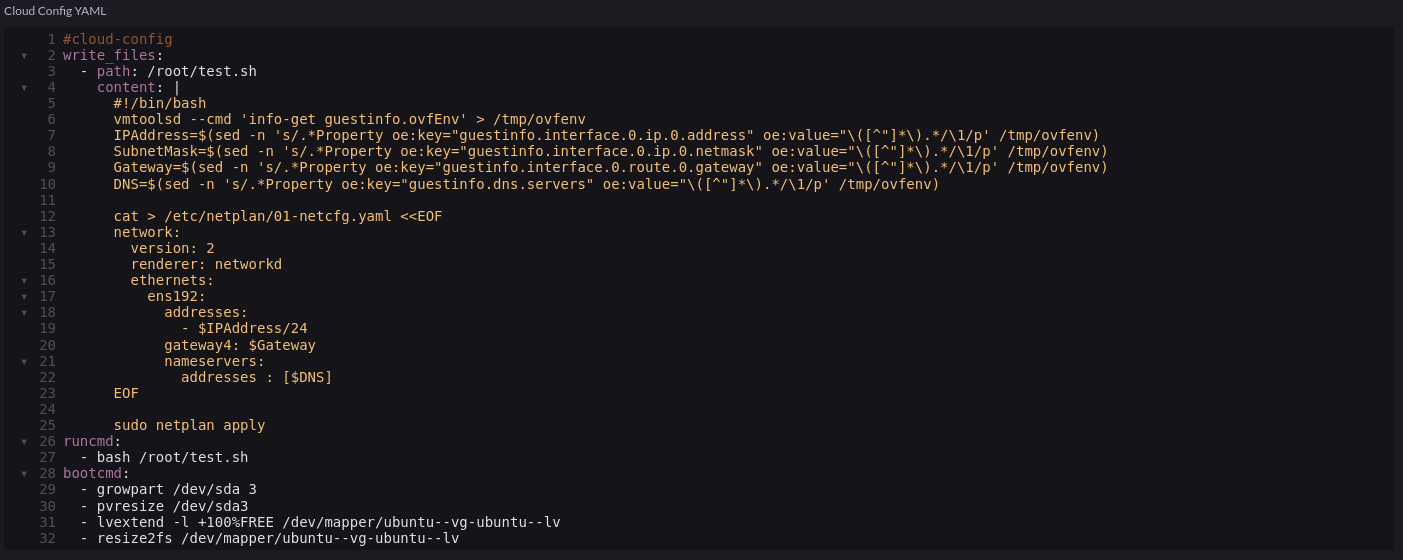
In the cloud-init config, we add a script to extrapolate the ovf environment that vSphere will provide via the Network Profile and configure the underlying OS. In this case, Ubuntu 22.04 using Netplan:

Code snippet:

#cloud-config
write_files:
  - path: /root/test.sh
    content: |
      #!/bin/bash
      vmtoolsd --cmd 'info-get guestinfo.ovfEnv' > /tmp/ovfenv
      IPAddress=$(sed -n 's/.*Property oe:key="guestinfo.interface.0.ip.0.address" oe:value="\([^"]*\).*/\1/p' /tmp/ovfenv)
      SubnetMask=$(sed -n 's/.*Property oe:key="guestinfo.interface.0.ip.0.netmask" oe:value="\([^"]*\).*/\1/p' /tmp/ovfenv)
      Gateway=$(sed -n 's/.*Property oe:key="guestinfo.interface.0.route.0.gateway" oe:value="\([^"]*\).*/\1/p' /tmp/ovfenv)
      DNS=$(sed -n 's/.*Property oe:key="guestinfo.dns.servers" oe:value="\([^"]*\).*/\1/p' /tmp/ovfenv)

      cat > /etc/netplan/01-netcfg.yaml <<EOF
      network:
        version: 2
        renderer: networkd
        ethernets:
          ens192:
            addresses:
              - $IPAddress/24
            gateway4: $Gateway
            nameservers:
              addresses : [$DNS]
      EOF

      sudo netplan apply
runcmd:
  - bash /root/test.sh
bootcmd:
  - growpart /dev/sda 3
  - pvresize /dev/sda3
  - lvextend -l +100%FREE /dev/mapper/ubuntu--vg-ubuntu--lv
  - resize2fs /dev/mapper/ubuntu--vg-ubuntu--lv

What took me a little while to figure out is the application of this feature is essentially a glorified transport mechanism for a bunch of key/value pairs – how they are leveraged is down to external scripting/tooling. VMTools will not do this magic for us.

Next, we configure the vApp portion of the cluster (how we consume the Network Protocol Profile:

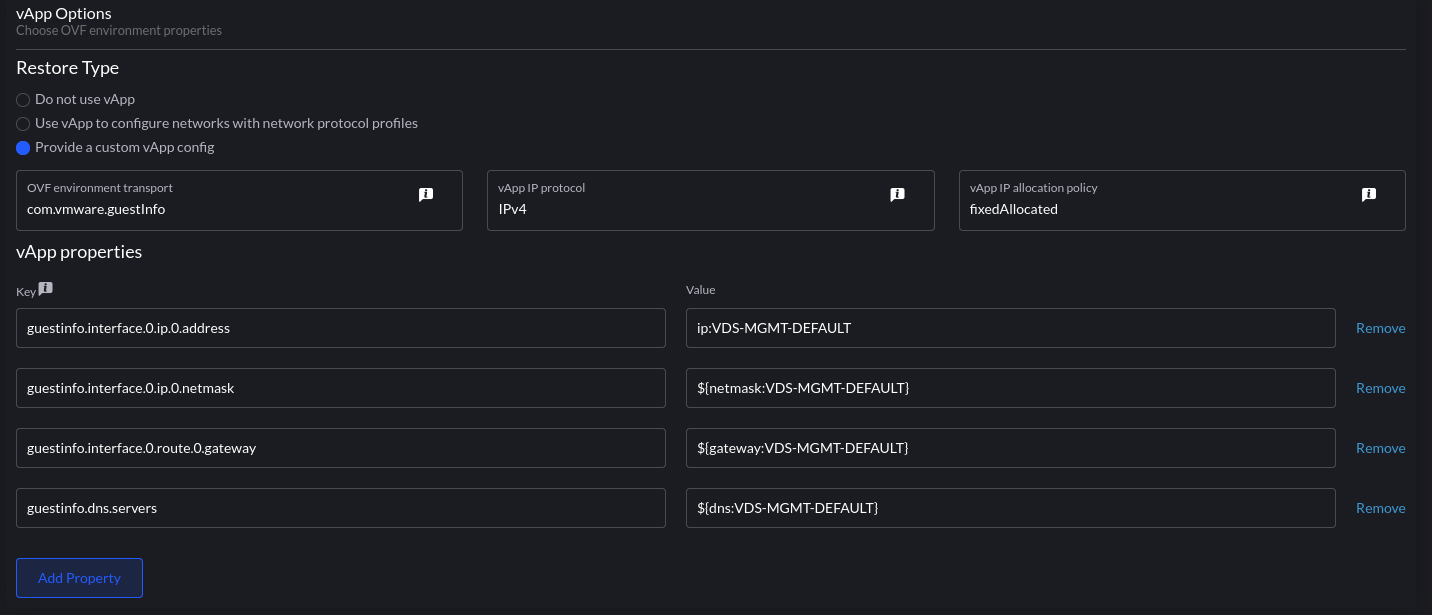
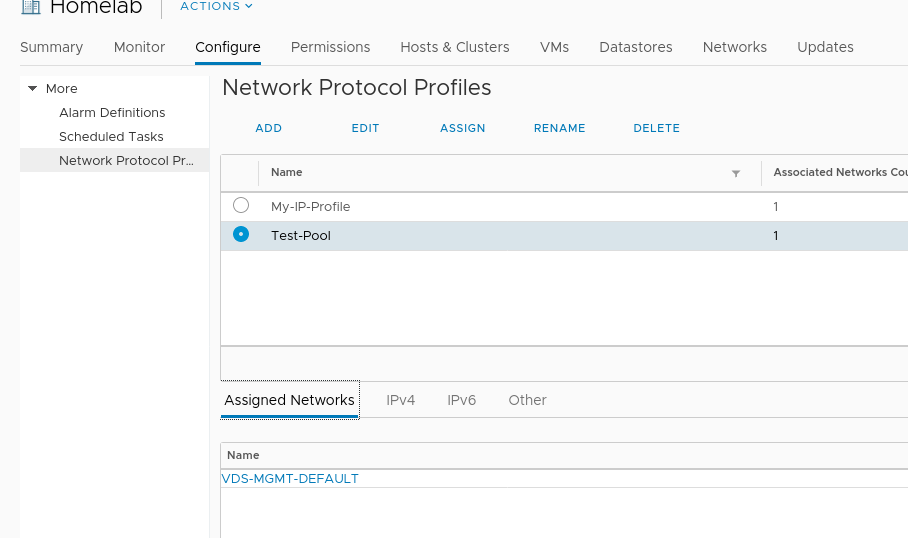
the format is param:portgroup. ip:VDS-MGMT-DEFAULT will be an IP address from the pool we defined earlier – vSphere will take an IP out of the pool and assign it to each VM associated with this template. This can be validated from the UI:

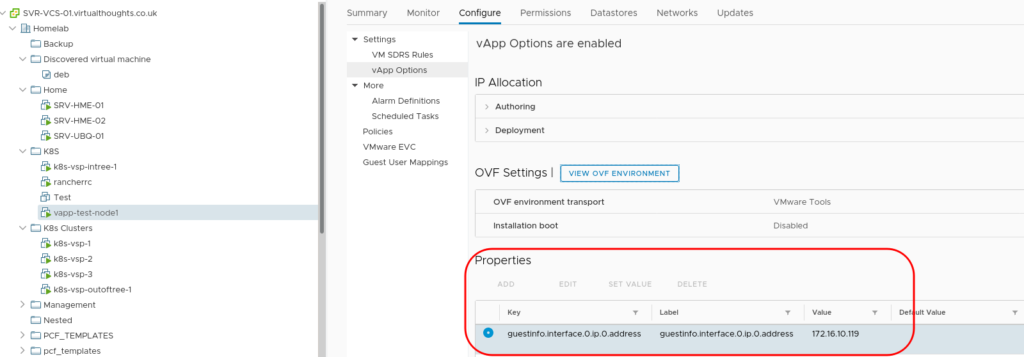
What we essentially do with the cloud-init script is extract this and apply it as a configuration to the VM.

This could be seen as the best of both worlds – Leveraging vSphere Network Profiles for predictable IP assignment whilst avoiding DHCP and the need to implement many Node Templates in Rancher.

K3S and Nvidia Jetson Nano

K3S is a lightweight Kubernetes distribution developed by Rancher Labs, perfect for Edge Computing use cases where compute resources may be somewhat limited. It supports x86_64, ARMv7, and ARM64 architectures.

Ok, why the Nvidia Nano?

Deploying Kubernetes, be it K8s, K3s or otherwise is fairly well documented on devices such as the Raspberry Pi, however, I wanted to have an attempt doing so on a Nano for the GPU capabilities, which might be beneficial with ML/AI workloads.

Step 1 – Prep the Nano

Nvidia already has this well documented at https://developer.nvidia.com/embedded/learn/get-started-jetson-nano-devkit but the basics are to apply the provided image to an SD card.

Optional Step – Run OS from SSD

I decided to hook up my Nano to an SSD for better disk performance. JetsonHacks have a superb guide on how to set this up – but it still requires the use of an SD card as the Nano currently can’t boot from USB.

Step 2 – Update the Nano

It’s crucial that as a minimum docker is updated, but updating everything by doing a sudo apt update && sudo apt upgrade -y is a good idea.

The reasoning behind upgrading Docker is as of 19.03 usage of nvidia-docker2 packages is deprecated since Nvidia GPUs are now natively supported as devices in the Docker runtime. The Jetson image comes pre-installed with Docker.

Step 3 – Check Docker and Set the Default Runtime

Inspect the Docker configuration for the available runtimes:

david@jetson:~$ sudo docker info | grep Runtime
 Runtimes: runc nvidia
 Default Runtime: runc

As a test, if we run a simple container to probe the GPU with the default runtime it will fail.

david@jetson:~$ sudo docker run -it  jitteam/devicequery
./deviceQuery Starting...

 CUDA Device Query (Runtime API) version (CUDART static linking)

cudaGetDeviceCount returned 35
-> CUDA driver version is insufficient for CUDA runtime version
Result = FAIL

This is expected. runc in its current state isn’t GPU-aware, or at least, not aware enough to natively integrate with Nvidia GPU’s, but the Nvidia runtime is. We can test this by specifying the --runtime flag in the Docker command:

david@jetson:~$ sudo docker run -it --runtime nvidia jitteam/devicequery
./deviceQuery Starting...

 CUDA Device Query (Runtime API) version (CUDART static linking)

Detected 1 CUDA Capable device(s)

Device 0: "NVIDIA Tegra X1"
  CUDA Driver Version / Runtime Version          10.0 / 10.0
  CUDA Capability Major/Minor version number:    5.3
  Total amount of global memory:                 3964 MBytes (4156911616 bytes)
  ( 1) Multiprocessors, (128) CUDA Cores/MP:     128 CUDA Cores
  GPU Max Clock rate:                            922 MHz (0.92 GHz)
  Memory Clock rate:                             1600 Mhz
  Memory Bus Width:                              64-bit
  L2 Cache Size:                                 262144 bytes

Next, modify /etc/docker/daemon.json to set “nvidia” as the default runtime:

{
    "default-runtime": "nvidia",
    "runtimes": {
        "nvidia": {
            "path": "nvidia-container-runtime",
            "runtimeArgs": []
        }
    }
}

Restart Docker:

sudo systemctl restart docker

And validate:

david@jetson:~$ sudo docker info | grep Runtime
 Runtimes: nvidia runc
 Default Runtime: nvidia

This will negate the need to define --runtime for subsequent containers

Install K3s

Installing K3s is very easy, the only difference to make in this scenario is to leverage Docker as the container runtime, instead of containerd which can be done by specifying it as an argument:

curl -sfL https://get.k3s.io | INSTALL_K3S_EXEC="--docker" sh -s -

After K3s has done its thing, we can validate by:

david@jetson:~$ kubectl get no -o wide
NAME     STATUS   ROLES    AGE    VERSION        INTERNAL-IP     EXTERNAL-IP   OS-IMAGE             KERNEL-VERSION   CONTAINER-RUNTIME
jetson   Ready    master   2d6h   v1.17.3+k3s1   192.168.1.218   <none>        Ubuntu 18.04.4 LTS   4.9.140-tegra    docker://19.3.6

Deploying the previous container as a workload:

david@jetson:~$ kubectl run -i -t nvidia --image=jitteam/devicequery --restart=Never       
./deviceQuery Starting...

 CUDA Device Query (Runtime API) version (CUDART static linking)

Detected 1 CUDA Capable device(s)

Device 0: "NVIDIA Tegra X1"
  CUDA Driver Version / Runtime Version          10.0 / 10.0
  CUDA Capability Major/Minor version number:    5.3
  Total amount of global memory:                 3964 MBytes (4156911616 bytes)
  ( 1) Multiprocessors, (128) CUDA Cores/MP:     128 CUDA Cores
  GPU Max Clock rate:                            922 MHz (0.92 GHz)
  Memory Clock rate:                             1600 Mhz
  Memory Bus Width:                              64-bit
  L2 Cache Size:                                 262144 bytes
  Maximum Texture Dimension Size (x,y,z)         1D=(65536), 2D=(65536, 65536), 3D=(4096, 4096, 4096)
  Maximum Layered 1D Texture Size, (num) layers  1D=(16384), 2048 layers
  Maximum Layered 2D Texture Size, (num) layers  2D=(16384, 16384), 2048 layers

On-prem K8s clusters with Rancher, Terraform and Ubuntu

One of the attractive characteristics of Kubernetes is how it can run pretty much anywhere – in the cloud, in the data center, on the edge, on your local machine and much more. Leveraging existing investments in datacenter resources can be logical when deciding where to place new Kubernetes clusters, and this post goes into automating this with Rancher and Terraform.

Primer

For this exercise the following is leveraged:

  • Rancher 2.3
  • vSphere 6.7
  • Ubuntu 18.04 LTS

An Ubuntu VM will be created and configured into a template to spin up Kubernetes nodes.

Step 1 – Preparing a Ubuntu Server VM

In Rancher 2.3 Node templates for vSphere can leverage either of the following:

For the purposes of this demo, "Deploy from template" will be used, given its simplicity.

To create a new VM template, we must first create a VM. Right-click an appropriate object in vCenter and select "New Virtual Machine"

Select a source:

Give it a name:

Give it a home (compute):

Give it a home (storage):

Specify the VM hardware version:

Specify the guest OS:

Configure the VM properties, ensure the Ubuntu install CD is mounted:

After this, power up the VM and walk through the install steps. After which it can be turned into a template:

Rancher doesn’t have much in the way of requirements for the VM. For this install method a VM needs to have:

  • Cloud-Init (Installed by default on Ubuntu 18.04).
  • SSH connectivity (Rancher will provide its own SSH certificates as per Cloud-Init bootstrap) – Ensure SSH server has been installed.

A Note on Cloud-Init

For Vanilla Ubuntu Server installs, it uses Cloud-Init as part of the general Installation process. As such, cloud-init can not be re-invoked on startup by default. To get around this for templating purposes, the VM must be void of the existing cloud-init configuration prior to being turned into a template. To accomplish this, run the following:

sudo rm -rf /var/lib/cloud/instances

Before shutting down the VM and converting it into a template.

Constructing the Terraform Script

Now the VM template has been created it can be leveraged by a Terraform script:

Specify the provider: (Note – insecure = "true" Is required for vCenter servers leveraging an untrusted certificate, such as self-signed.

provider "rancher2" {
  api_url    = "https://rancher.virtualthoughts.co.uk"
  access_key = #ommited - reference a Terraform varaible/environment variable/secret/etc
  secret_key = #ommited - reference a Terraform varaible/environment variable/secret/etc
  insecure = "true"
}

Specify the Cloud Credentials:

# Create a new rancher2 Cloud Credential
resource "rancher2_cloud_credential" "vsphere-terraform" {
  name = "vsphere-terraform"
  description = "Terraform Credentials"
  vsphere_credential_config {
    username = "Terraform@vsphere.local"
    password = #ommited - reference a Terraform varaible/environment variable/secret/etc
    vcenter = "svr-vcs-01.virtualthoughts.co.uk"
  }
}

Specify the Node Template settings:

Note we can supply extra cloud-config options to further customise the VM, including adding additional SSH keys for users.

resource "rancher2_node_template" "vSphereTestTemplate" {
  name = "vSphereTestTemplate"
  description = "Created by Terraform"
  cloud_credential_id = rancher2_cloud_credential.vsphere-terraform.id
   vsphere_config {
   cfgparam = ["disk.enableUUID=TRUE"]
   clone_from = "/Homelab/vm/Ubuntu1804WithCloudInit"
   cloud_config = "#cloud-config\nusers:\n  - name: demo\n    ssh-authorized-keys:\n      - ssh-rsa [SomeKey]
   cpu_count = "4"
   creation_type = "template"
   disk_size = "20000"
   memory_size = "4096"
   datastore = "/Homelab/datastore/NFS-500"
   datacenter = "/Homelab"
   pool = "/Homelab/host/MGMT/Resources"
   network = ["/Homelab/network/VDS-MGMT-DEFAULT"]
   }
}

Specify the cluster settings:

resource "rancher2_cluster" "vsphere-test" {
  name = "vsphere-test"
  description = "Terraform created vSphere Cluster"
  rke_config {
    network {
      plugin = "canal"
    }
  }
}

Specify the Node Pool:

resource "rancher2_node_pool" "nodepool" {

  cluster_id =  rancher2_cluster.vsphere-test.id
  name = "all-in-one"
  hostname_prefix =  "vsphere-cluster-0"
  node_template_id = rancher2_node_template.vSphereTestTemplate.id
  quantity = 1
  control_plane = true
  etcd = true
  worker = true
}

After which the script can be executed.

What’s going on?

From a high level the following activities are being executed:

  1. Rancher requests VM’s from vSphere using supplied Cloud Credentials.
  2. vSphere clones the VM Templateeverywhere with the specified configuration parameters.
  3. An ISO image is mounted to the VM, which contains certificates and configuration generated by Rancher in the cloud-init format.
  4. Cloud-Init on startup reads this ISO image and applies the configuration.
  5. Rancher builds the Kubernetes cluster by Installing Docker and pulling down the images.

After which, a shiny new cluster will be created!

« Older posts Newer posts »

© 2025 Virtual Thoughts

Theme by Anders NorenUp ↑

Social media & sharing icons powered by UltimatelySocial
RSS
Twitter
Visit Us
Follow Me