Virtual Thoughts

Virtualisation, Storage and various other ramblings.

Page 10 of 24

K8s, MetalLB and Pihole

An ongoing project of mine involves the migration of home services (Unifi, Pi-hole, etc) to my Kubernetes cluster. This post explores my approach to migrating Pi-hole, with the help of MetalLB.

MetalLB Overview

MetalLB is a load balancer implementation for environments that do not natively provide this functionality. For example, with AWS, Azure, GCP and others, provisioning a “LoadBalancer” service will make API calls to the respective cloud provider to provision a load balancer. For bare-metal / on-premises and similar environments this may not work (depending on the CNI used). MetalLB bridges this functionality to these environments so services can be exposed externally.


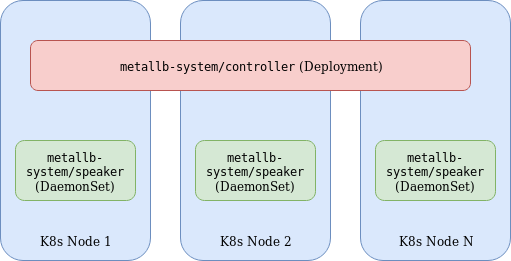
MetalLB consists of the following components:

  • Controller Deployment – A single replica deployment responsible for IP assignment.
  • Speaker DaemonSet – Facilitates communication based on the specified protocols used for external services.
  • Controller and Speaker service accounts – RBAC permissions required for respective components.
  • Configuration ConfigMap – Specifies parameters for either L2 or BGP configuration. The former being used in this example for simplicity.

The Speaker and Controller components can be deployed by applying the MetalLB manifest:

kubectl apply -f https://raw.githubusercontent.com/google/metallb/v0.8.1/manifests/metallb.yaml

A configmap is used to complement the deployment by specifying the required parameters. Below is an example I’ve used.

apiVersion: v1
kind: ConfigMap
metadata:
namespace: metallb-system
name: config
data:
config: |
address-pools:
- name: default
protocol: layer2
addresses:
- 172.16.10.221-172.16.10.230

The end result is any service of type “LoadBalancer” will be provisioned from the pool of IP addresses in the above configmap.


PI-Hole Overview

Pi-Hole is a network-wide adblocker. It’s designed to act as a DNS resolver employing some intelligence to identify and block requests to known ad sites. An advantage of implementing it vs something like Ublock Origin, is PiHole operates at the network level, and is, therefore, device/client agnostic and requires no plugins/software on the originating device.


The makers of Pi-Hole have an official Dockerhub repo for running Pi-Hole as a container, which makes it easier to run in Kubernetes, but with some caveats, as is described below.

Storing Persistent Data with Pi-Hole

A Pi-Hole container can be fired up with relative ease and provides some effective ad-blocking functionality but if the container is deleted or restarted, any additional configuration post-creation will be lost, it would, therefore, be convenient to have a persistent location for the Pi-Hole configuration, so blocklist / regex entries / etc could be modified. The makers of Pi-Hole have documented the location and use of various configuration files. Of interest are the following:

adlists.list: a custom user-defined list of blocklist URL’s (public blocklists maintained by Pi-Hole users). Located in /etc/pihole

regex.list : file of regex filters that are compiled with each pihole-FTL start or restart. Located in /etc/pihole


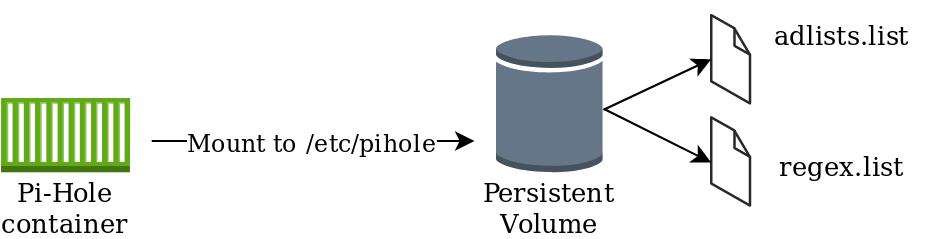
Approach #1 – Persistent Volumes

This approach leverages a persistent volume mounted to /etc/pihole with a “Retain” policy. This would ensure that if the container terminates, the information in /etc/pihole would be retained. One disadvantage of this includes the operational overhead of implementing and managing Persistent Volumes.

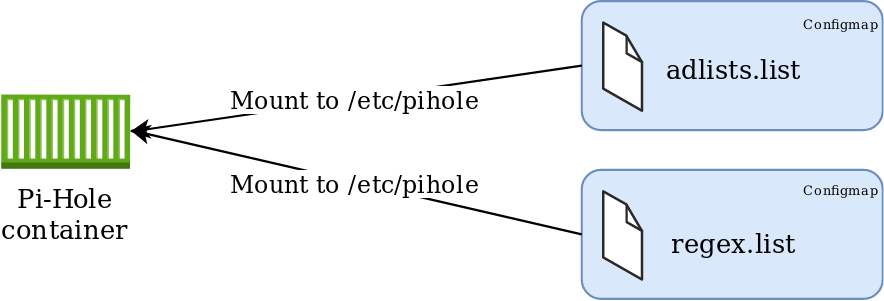
Approach #2 – Config Maps

This approach leverages configmaps mounted directly to the pod, presented as files. Using this method will ensure consistency of configuration parameters without the need to maintain persistent volumes, with the added benefit of residing within the etcd database and is therefore included in etcd backups. This method also completely abstracts the configuration from the pod, which can easily facilitate updates/changes.


Implementation

Given the options, I felt #2 was better suited for my environment. YAML manifests can be found in https://github.com/David-VTUK/k8spihole.


00-namespace.yaml

Create a namespace for our application. This will be referenced later

apiVersion: v1
kind: ConfigMap
metadata:
namespace: metallb-system
name: config
data:
config: |
address-pools:
- name: default
protocol: layer2
addresses:
- 172.16.10.221-172.16.10.230

01-configmaps.yaml

This is where our persistent configuration will be stored.

Location for adlists:

apiVersion: v1
kind: ConfigMap
metadata:
name: pihole-adlists
namespace: pihole-test
data:
adlists.list: |
https://raw.githubusercontent.com/StevenBlack/hosts/master/hosts
......etc

Location for regex values

apiVersion: v1
kind: ConfigMap
metadata:
name: pihole-regex
namespace: pihole-test
data:
regex.list: |
^(.+[-_.])??adse?rv(er?|ice)?s?[0-9]*[-.]
......etc

Setting environment variables for the timezone and upstream DNS servers.

apiVersion: v1
kind: ConfigMap
metadata:
name: pihole-env
namespace: pihole-test
data:
TZ: UTC
DNS1: 1.1.1.1
DNS2: 1.0.0.1

02-deployment.yaml

This manifest defines the parameters of the deployment, of significance are how the config maps are consumed. For example, the environment variables are set from the respective configmap:

containers:
- name: pihole
image: pihole/pihole
env:
- name: TZ
valueFrom:
configMapKeyRef:
name: pihole-env
key: TZ

The files are mounted from the aforementioned configmaps as volumes:

volumeMounts:
- name: pihole-adlists
mountPath: /etc/pihole/adlists.list
subPath: adlists.list
- name: pihole-regex
mountPath: /etc/pihole/regex.list
subPath: regex.list
volumes:
- name: pihole-adlists
configMap:
name: pihole-adlists
- name: pihole-regex
configMap:
name: pihole-regex

03-service.yaml

Currently, you cannot mix UDP and TCP services on the same Kubernetes load balancer, therefore two services are created. One for the DNS queries (UDP 53) and one for the web interface (TCP 80)

kind: Service
apiVersion: v1
metadata:
name: pihole-web-service
namespace : pihole-test
spec:
selector:
app: pihole
ports:
- protocol: TCP
port: 80
targetPort: 80
name : web
type: LoadBalancer
---
kind: Service
apiVersion: v1
metadata:
name: pihole-dns-service
namespace: pihole-test
spec:
selector:
app: pihole
ports:
- protocol: UDP
port: 53
targetPort: 53
name : dns
type: LoadBalancer

Deployment

After configuring the configmaps, the manifests can be deployed:

david@david-desktop:~/pihole$ kubectl apply -f .
namespace/pihole-test created
configmap/pihole-adlists created
configmap/pihole-regex created
configmap/pihole-env created
deployment.apps/pihole-deployment created
service/pihole-web-service created
service/pihole-dns-service created

Extract the password for Pi-Hole from the container:

david@david-desktop:~/pihole$ kubectl get po -n pihole-test
NAME                                 READY   STATUS    RESTARTS   AGE
pihole-deployment-6ffb58fb8f-2mc97   1/1     Running   0          2m24s
david@david-desktop:~/pihole$ kubectl logs pihole-deployment-6ffb58fb8f-2mc97 -n pihole-test | grep random
Assigning random password: j6ddiTdS

Identify the IP address of the web service:

david@david-desktop:~/pihole$ kubectl get svc -n pihole-test
NAME                 TYPE           CLUSTER-IP       EXTERNAL-IP     PORT(S)        AGE
pihole-dns-service   LoadBalancer   10.100.40.39     172.16.10.226   53:31725/UDP   3m38s
pihole-web-service   LoadBalancer   10.107.251.224   172.16.10.225   80:30735/TCP   3m38s

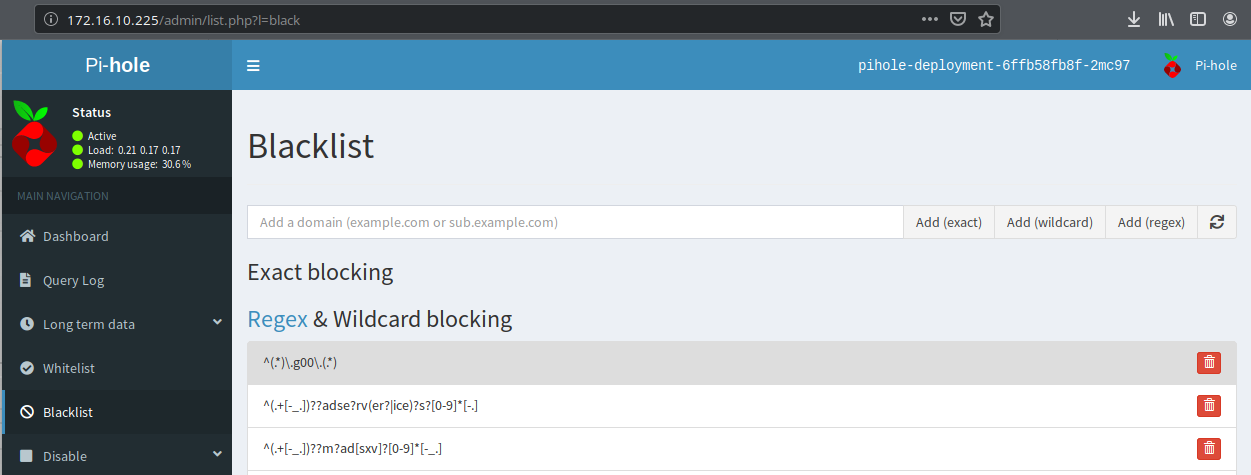
Access Pi-Hole on the web service external IP using the password extracted from the pod:

All that remains is to reconfigure DHCP or static settings to point to the pihole-dns-service Loadbalancer address for its DNS queries.

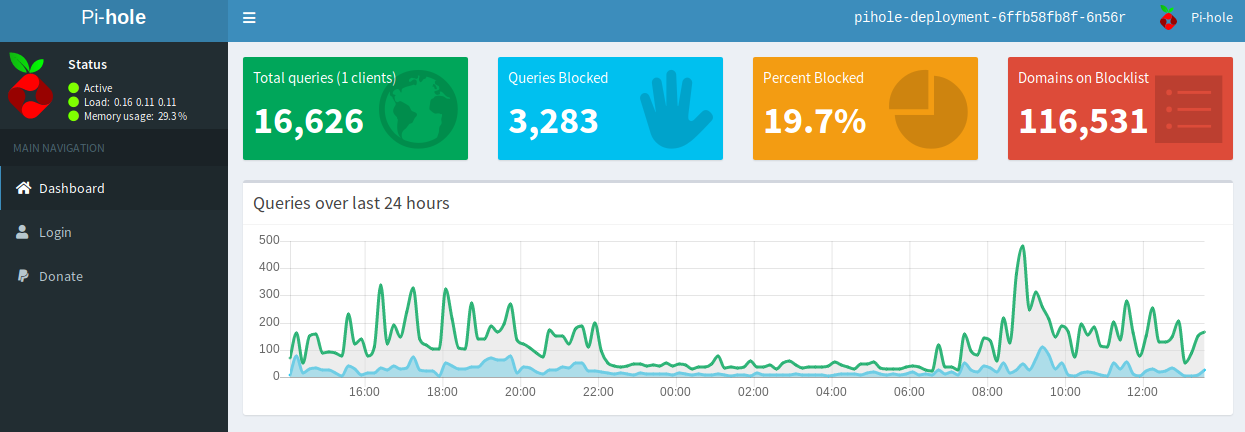
I’m quite surprised how much it has blocked thus far (~48 hours of usage):


Happy Ad Blocking!


Creating a highly available, cross AZ, loadbalanced ETCD cluster in AWS with Terraform

Having experimented with Terraform recently, I decided to leverage this tool by creating an etcd cluster in AWS. This blog post goes through the steps used to accomplish this. For readability, I’ve only quoted pertinent code snippets, but all of the code can be found at https://github.com/David-VTUK/terraformec2.

Disclaimer

I do not profess to be an Etcd, Terraform or AWS expert, therefore he be dragons in the form of implementations unlikely to be best practice or production-ready. In particular, I would like to revisit this at some point and enhance it to include:

  • Securing all Etcd communication with generated certs.
  • Implement a mechanism for rotating members in/out of the cluster.
  • Leverage auto-scaling groups for both bastion and Etcd members.
  • Locking down the security groups.
  • ….and a  lot more.


Architecture

The basic principles of this implementation are as follows:

  • Etcd members will reside in private subnets and accessed via an internal load-balancer.
  • Etcd members will be joined to a cluster by leveraging the Etcd discovery URL.
  • A bastion host will be used to proxy all access to the private subnets.
  • The Terraform script creates all the components, at the VPC level and beyond.

The scripts are separated into the following files:

.
├── deployetcd.tpl
├── etcdBootstrapScript.tf
├── etcdEC2Instances.tf
├── etcdMain.tf
├── etcdNetworking.tf
├── etcdSecurityGroups.tf
├── etcdVPC.tf
├── terraformec2.pem
├── terraform.tfstate
└── terraform.tfstate.backup

deployEtcd.tpl

This is a template file for Terraform, it’s used to generate a bootstrap script to run on each of our Etcd nodes.

To begin with, download Etcd, extract and do some general housekeeping with regards to access and users. It will also output two environment variables – ETCD_HOST_IP and ETCD_NAME, which is needed for the Systemd unit file.

cd /usr/local/src
sudo wget "https://github.com/coreos/etcd/releases/download/v3.3.9/etcd-v3.3.9-linux-amd64.tar.gz"
sudo tar -xvf etcd-v3.3.9-linux-amd64.tar.gz
sudo mv etcd-v3.3.9-linux-amd64/etcd* /usr/local/bin/
sudo mkdir -p /etc/etcd /var/lib/etcd
sudo groupadd -f -g 1501 etcd
sudo useradd -c "etcd user" -d /var/lib/etcd -s /bin/false -g etcd -u 1501 etcd
sudo chown -R etcd:etcd /var/lib/etcd

export ETCD_HOST_IP=$(ip addr show eth0 | grep "inet\b" | awk '{print $2}' | cut -d/ -f1)
export ETCD_NAME=$(hostname -s)

Create the Systemd unit file

sudo -E bash -c 'cat << EOF > /lib/systemd/system/etcd.service
[Unit]
Description=etcd service
Documentation=https://github.com/coreos/etcd

[Service]
User=etcd
Type=notify
ExecStart=/usr/local/bin/etcd \\
 --data-dir /var/lib/etcd \\
 --discovery ${discoveryURL} \\
 --initial-advertise-peer-urls http://$ETCD_HOST_IP:2380 \\
 --name $ETCD_NAME \\
 --listen-peer-urls http://$ETCD_HOST_IP:2380 \\
 --listen-client-urls http://$ETCD_HOST_IP:2379,http://127.0.0.1:2379 \\
 --advertise-client-urls http://$ETCD_HOST_IP:2379 \\

[Install]
WantedBy=multi-user.target
EOF'

${discoveryURL} is a placeholder variable. The Terraform script will replace this and generate the script file with a value for this variable.

etcdBootstrapScript.tf

This is where the discovery token is generated, parsed into the template file to which a new file will be generated – our complete bootstrap script. Simply performing an HTTP get request to the discovery URL will return a unique identifier URL in the response body. So we grab this response and store it as a data object. Note “size=3” denotes the explicit size of the Etcd cluster.

data "http" "etcd-join" {
  url = "https://discovery.etcd.io/new?size=3"
}

Take this data and parse it into the template file, filling it the variable ${discoveryURL} with the unique URL generated.

data "template_file" "service_template" {
  template = "${file("./deployetcd.tpl")}"

  vars = {
    discoveryURL = "${data.http.etcd-join.body}"
  }
}

Take the generated output, and store it as “script.sh” in the local directory

resource "local_file" "template" {
  content  = "${data.template_file.service_template.rendered}"
  filename = "script.sh"
}

The purpose of this code block is to generate one script to be executed on all three Etcd members, each joining a specific 3 node etcd cluster.

etcdEC2Instances.tf

This script performs the following:

  • Create a bastion host in the public subnet with a public IP.
  • Create three etcd instanced in each AZ, and execute the generated script via the bastion host:
    connection {
    host = "${aws_instance.etc1.private_ip}"
    port = "22"
    type = "ssh"
    user = "ubuntu"
    private_key = "${file("./terraformec2.pem")}"
    timeout = "2m"
    agent = false

    bastion_host = "${aws_instance.bastion.public_ip}"
    bastion_port = "22"
    bastion_user = "ec2-user"
    bastion_private_key = "${file("./terraformec2.pem")}"
}

  provisioner "file" {
    source      = "script.sh"
    destination = "/tmp/script.sh"
  }

  provisioner "remote-exec" {
    inline = [
      "chmod +x /tmp/script.sh",
      "/tmp/script.sh",
    ]
  }

etcdMain.tf

  • Contains access and secret keys for AWS access

etcdNetworking.tf

Configures the following:

  • Elastic IP for NAT gateway.
  • NAT gateway so private subnets can route out to pull etcd.
  • Three subnets in the EU-West-2 region
    • EU-West-2a
    • EU-West-2b
    • EU-West-2c
  • An ALB that spans across the aforementioned AZ’s:
    • Create a target group.
    • Create a listener on Etcd port.
    • Attach EC2 instances.
    • A health check that probes :2779/version on the Etcd EC2 instances.
  • An Internet Gateway and attach to VPC

etcdSecurityGroups.tf

  • Creates a default security group, allowing all (don’t do this in production)

etcdVPC.tf

  • Creates the VPC with a subnet of 10.0.0.0/16

terraformec2.pem

  • Key used to SSH into the bastion host and Etcd EC2 instances.

Validating

Log on to each ec2 instance and check the service via “journalctl -u etcd.service”. In particular, we’re interested in the peering and if any errors occur.

ubuntu@ip-10-0-1-100:~$ journalctl -u etcd.service
Sep 08 15:34:22 ip-10-0-1-100 etcd[1575]: found peer b8321dfeb5729811 in the cluster
Sep 08 15:34:22 ip-10-0-1-100 etcd[1575]: found peer 7e245ce888bd3e1f in the cluster
Sep 08 15:34:22 ip-10-0-1-100 etcd[1575]: found self b4ccf12cb29f9dda in the cluster
Sep 08 15:34:22 ip-10-0-1-100 etcd[1575]: discovery URL= https://discovery.etcd.io/32656e986a6a53a90b4bdda27559bf6e
 cluster 29d1ca9a6b0f3f87
Sep 08 15:34:23 ip-10-0-1-100 systemd[1]: Started etcd service.
Sep 08 15:34:23 ip-10-0-1-100 etcd[1575]: ready to serve client requests
Sep 08 15:34:23 ip-10-0-1-100 etcd[1575]: set the initial cluster version to 3.3
Sep 08 15:34:23 ip-10-0-1-100 etcd[1575]: enabled capabilities for version 3.3

We can also check they’re registered and healthy with the ALB:

Next, run a couple of commands against the ALB address:

[ec2-user@ip-10-0-4-242 ~]$ etcdctl --endpoints http://internal-terraform-example-alb-824389756.eu-west-2.alb.amazonaws.com:2379 member list
7e245ce888bd3e1f: name=ip-10-0-3-100 peerURLs=http://10.0.3.100:2380 clientURLs=http://10.0.3.100:2379 isLeader=false
b4ccf12cb29f9dda: name=ip-10-0-1-100 peerURLs=http://10.0.1.100:2380 clientURLs=http://10.0.1.100:2379 isLeader=false
b8321dfeb5729811: name=ip-10-0-2-100 peerURLs=http://10.0.2.100:2380 clientURLs=http://10.0.2.100:2379 isLeader=true
[ec2-user@ip-10-0-4-242 ~]$ etcdctl --endpoints http://internal-terraform-example-alb-824389756.eu-west-2.alb.amazonaws.com:2379 cluster-health
member 7e245ce888bd3e1f is healthy: got healthy result from http://10.0.3.100:2379
member b4ccf12cb29f9dda is healthy: got healthy result from http://10.0.1.100:2379
member b8321dfeb5729811 is healthy: got healthy result from http://10.0.2.100:2379
cluster is healthy

Splendid. Now this cluster is ready to start serving clients.

Application security with mutual TLS (mTLS) via Istio

TLS Overview

If we take an example of accessing a website such as https://www.virtualthoughts.co.uk/, these are the high-level steps of what occurs:


  1. The client initiates a connection to the web server requesting an HTTPS connection.
  2. The web server responds with its public key. The client validates the key with its list of known Certificate Authorities.
  3. A session key is generated by the client and encrypted with the web server’s public key and is sent back to the web server.
  4. The web server decrypts the session key with its private key. End to end encryption is established.

By default, the TLS protocol only proves the identity of the server to the client using X.509 certificate and the authentication of the client to the server is left to the application layer.  For external, public-facing websites, this is an acceptable and well-established implementation of TLS. But what about communication between different microservices?


As opposed to monolithic applications, microservices are usually inter-connected which allow them to be scaled/modified/etc independently. But this does raise some challenges. For example:

  • How do we ensure service-to-service communication is always encrypted?
  • How can do we do this without changing the application source code?
  • How can we automatically secure communication when we introduce a new service to an application?
  • How can we authenticate clients and servers and fully establish a “zero trust” network policy?

Istio can help us address these challenges:

Example Application

To demonstrate Istio’s mTLS capabilities a WordPress Helm chart was deployed into a namespace with automatic sidecar injection. Installing and configuring Istio can be found on a previous blog post. By default, the policy specifies no mTLS between the respective services. As such, the topology of the solution is depicted below:


We can validate this by using Istioctl:


All of the “testsite” services (WordPress frontend and backend) Envoy proxies are using HTTP as their transport mechanism. Therefore mTLS has not been configured yet.

Creating Istio Objects – Policy and Destination Rules

As you might expect, establishing mutual TLS (mTLS) is a two-part process, First, we must configure the clients to leverage mTLS, as well as the servers. This is accomplished with Policy and Destination rules.

Policy (AKA – what I, the server, will accept)

apiVersion: "authentication.istio.io/v1alpha1"
kind: "Policy"
metadata:
name: "default"
namespace: "wordpress-app"
spec:
peers:
- mtls: {}

This example policy strictly enforces only mTLS connections between services within the “wordpress-app” namespace

DestinationRule (AKA – what I, the client, will send out)

 apiVersion: "authentication.istio.io/v1alpha1"
apiVersion: "networking.istio.io/v1alpha3"
kind: "DestinationRule"
metadata:
name: "vt-wordpress-mariadb"
namespace: "wordpress-app"
spec:
host: "*.wordpress-app.svc.cluster.local"
trafficPolicy:
tls:
mode: ISTIO_MUTUAL

This example enforces the use of mutual TLS when communicating with any service in the wordpress-app namespace. Applying these and re-running the previous istioctl command yields the following result:

This is accomplished largely due to Citadel – a component in the Istio control plane that manages certificate creation and distribution:

When mTLS is configured the traffic flow (from a high level) can be described as follows:

  • Citadel provides certificates to the sidecar pods and manages them.
  • WordPress pod creates a packet to query the MYSQL database.
    • WordPress Envoy sidecar pod intercepts this and establishes a connection to the destination sidecar pod and presents its certificate for authenticity.
  • MYSQL Envoy sidecar pod receives a connection request, validates the client’s certificate and sends its own back.
  • WordPress Envoy sidecar pod receives MYSQL’s certificate and checks it for authenticity.
  • Both proxies are in agreement as to each other’s identity and establish an encrypted tunnel between the two.

This is what makes it “mutual” TLS. In effect, both services are presenting, inspecting and validating each other’s certificate as a prerequisite for service-to-service communication. This differs from a standard HTTPs site described earlier on where only the client was validating the server.

Additional Comments

Some additional observations I’ve made from this exercise

  • If enforcing strict mTLS on a service that’s exposed externally from a load balancer, your clients will obviously need to send x509 certificates that can be validated by Citadel. A more flexible alternative to this is to employ an Istio gateway that provides TLS termination at the cluster boundary. This negates the need to provision x509 certs to each and every client, whilst maintaining mTLS within the cluster.
  • Envoy sidecar pods can affect liveness probes and might require you to implement
     sidecarInjectorWebhook.rewriteAppHTTPProbe=true 

    upon installing Helm 

« Older posts Newer posts »

© 2025 Virtual Thoughts

Theme by Anders NorenUp ↑

Social media & sharing icons powered by UltimatelySocial
RSS
Twitter
Visit Us
Follow Me