Virtualisation, Storage and various other ramblings.

Category: Microservices (Page 1 of 8)

Kubernetes on RK1 / Turing Pi 2: Automation with Ansible, Cilium and Cert-Manager

TLDR: Take me to the Playbook

Note – This is just a high-level overview, I’ll likely follow up with a post dedicated on the CIlium/BGP configuration.

I’ve had my Turing Pi 2 board for a while now, and during that time I’ve struggled to decide which automation tooling to use to bootstrap K3s to it. However, I reached a decision to use Ansible. It’s not something I’m overly familiar with, but this would provide a good opportunity to learn by doing.

The idea is pretty straightforward:
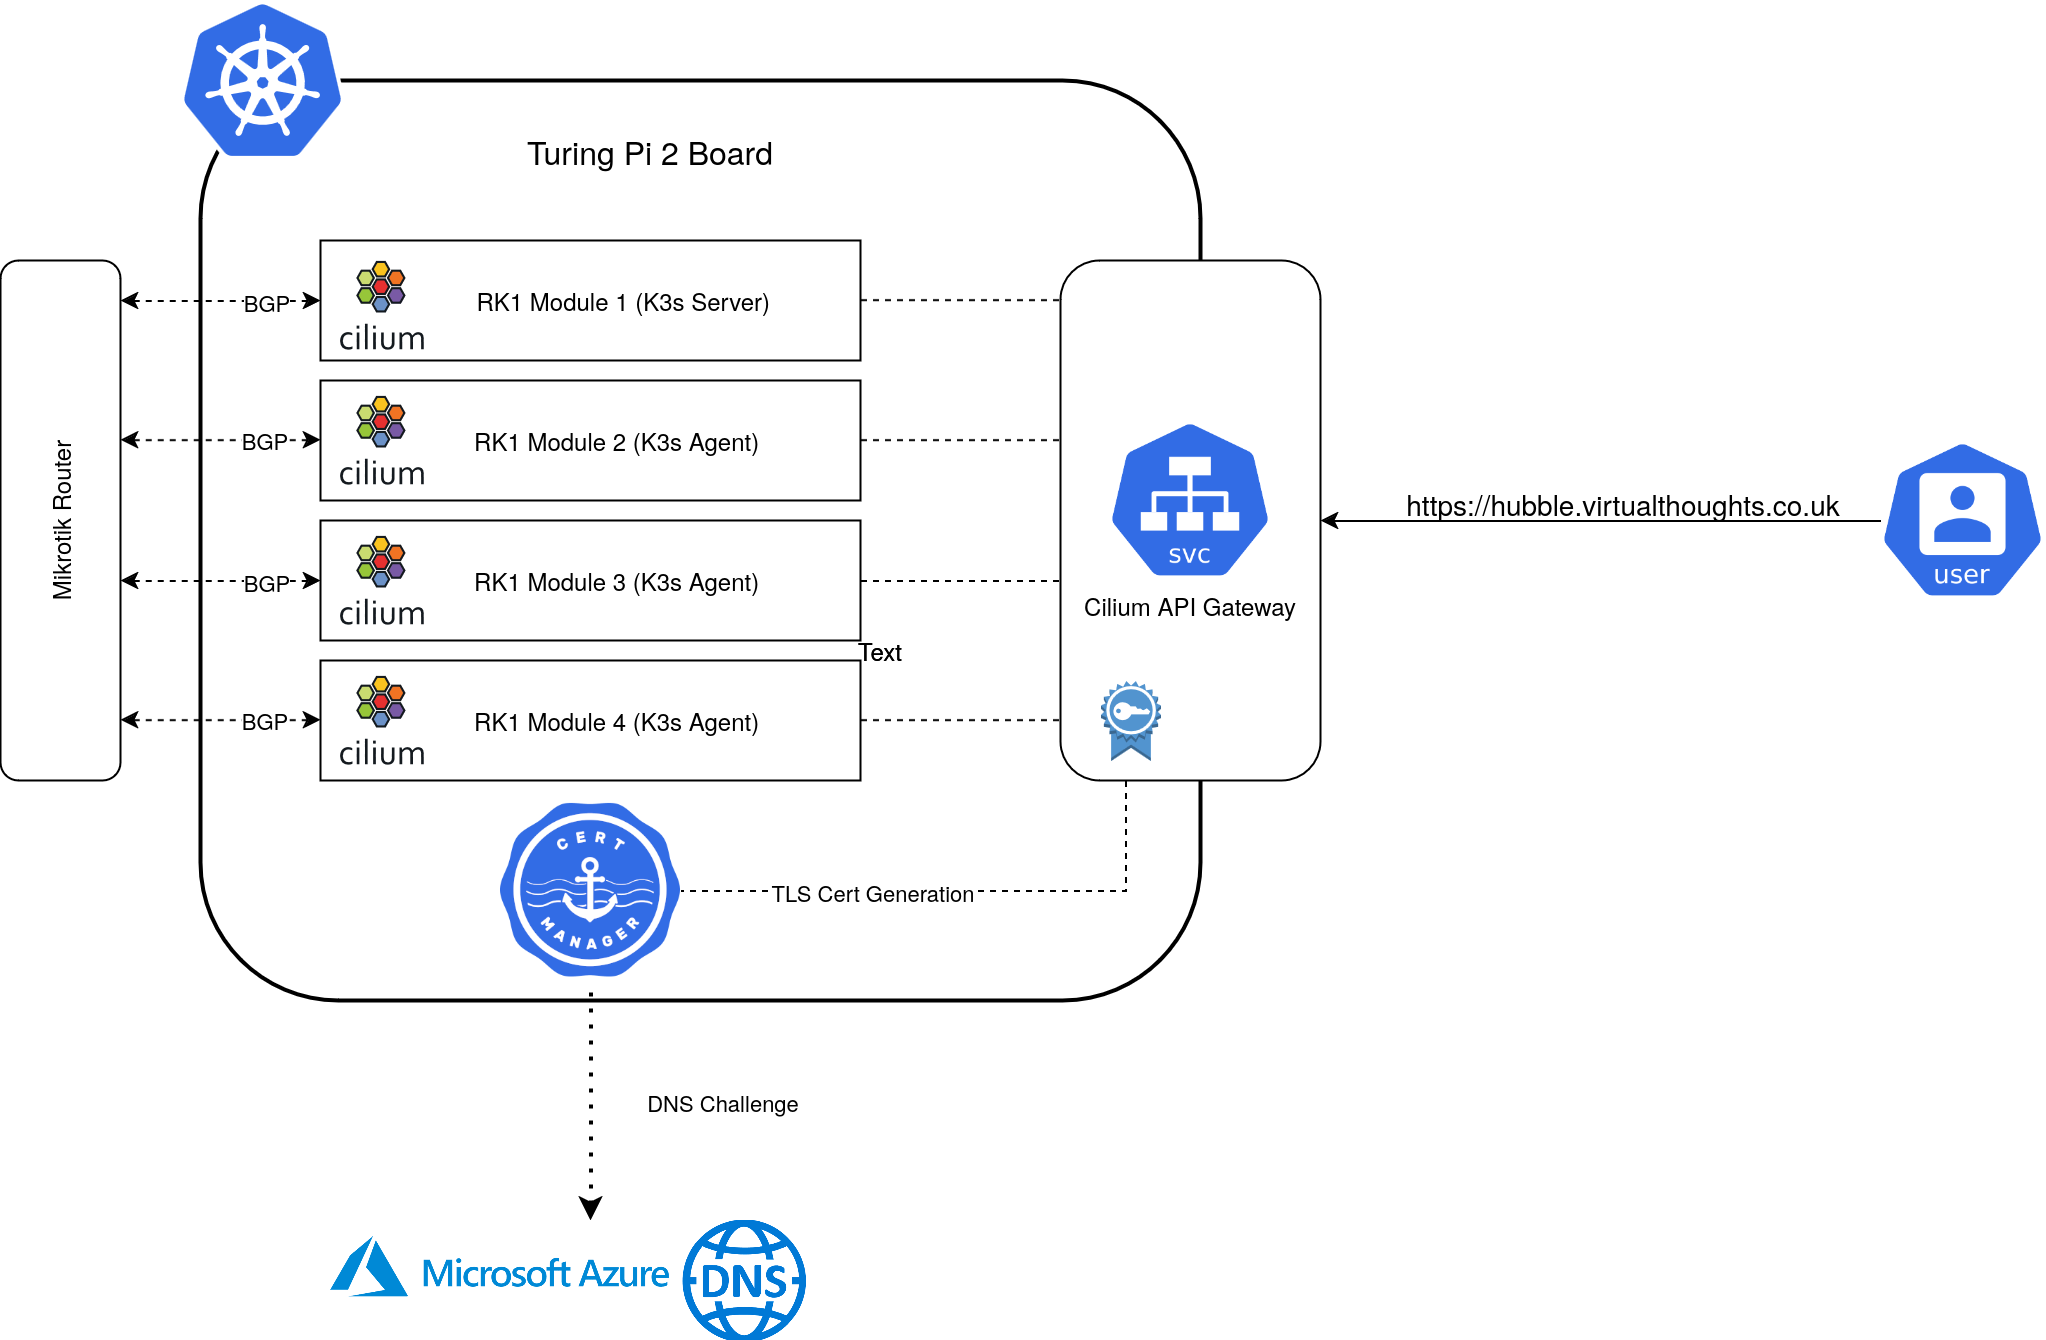
Each RK1 module is fairly well equipped:

  • 32GB Ram
  • 8 Core CPU
  • 512GB NVME SSD
  • Pre-Installed with Ubuntu

Mikrotik Config

Prior to standing up the cluster, the Mikrotik router can be pre-configured to peer with each of the RK1 Nodes, as I did:

routing/bgp/connection/ add address-families=ip as=64512 disabled=no local.role=ibgp name=srv-rk1-01 output.default-originate=always remote.address=172.16.10.221 routing-table=main

routing/bgp/connection/ add address-families=ip as=64512 disabled=no local.role=ibgp name=srv-rk1-02 output.default-originate=always remote.address=172.16.10.222 routing-table=main

routing/bgp/connection/ add address-families=ip as=64512 disabled=no local.role=ibgp name=srv-rk1-03 output.default-originate=always remote.address=172.16.10.223 routing-table=main

routing/bgp/connection/ add address-families=ip as=64512 disabled=no local.role=ibgp name=srv-rk1-04 output.default-originate=always remote.address=172.16.10.224 routing-table=main

Workflow

The following represents an overview of the steps code repo
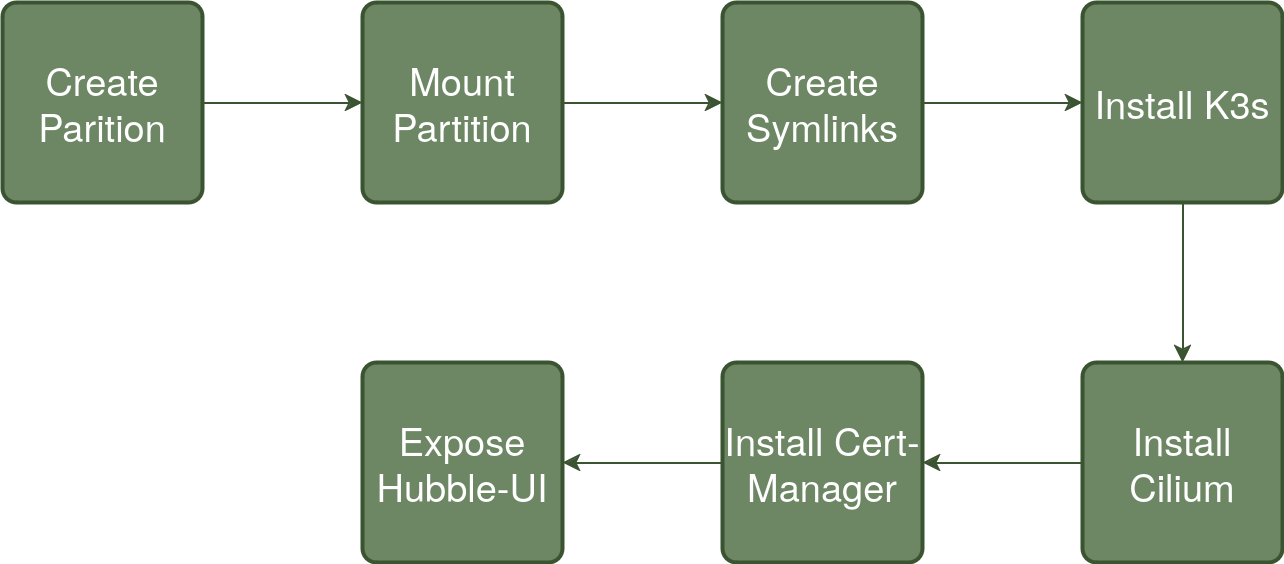
To summarise each step:

Create Partition

Each of my RK1 Modules has a dedicated 512GB NVME drive – This will be used for primary Kubernetes storage as well as container storage. The drive is presented as a raw block device and therefore needs partitioning before mounting.

Mount Partition

The created partition is mounted to /mnt/data and checked.

Create Symlinks

Three directories are primarily used by K3s/Containerd to store data. Symlinks are created so their contents effectively reside on the NVME drive. These are:

/run/k3s -> /mnt/data/k3s
/var/lib/kubelet -> /mnt/data/k3s-kubelet
/var/lib/rancher -> /mnt/data/k3s-rancher

Install K3s

To facilitate replacing both Kube-Proxy and the default CNI to Cilium’s equivalents, a number of flags are passed to the Server install script:

--flannel-backend=none
--disable-network-policy
--write-kubeconfig-mode 644
--disable servicelb
--token {{ k3s_token }}
--disable-cloud-controller
--disable local-storage
--disable-kube-proxy
--disable traefik

In addition, the GatewayAPI CRD’s are installed:

- name: Apply gateway API CRDs
  kubernetes.core.k8s:
    state: present
    src: https://github.com/kubernetes-sigs/gateway-api/releases/download/v1.1.0/experimental-install.yaml

Install Cilium

Cilium is is customised with the following options enabled:

  • BGP Control Plane
  • Hubble (Relay and UI)
  • GatewayAPI
  • BGP configuration to Peer with my Mikrotik router

Install Cert-Manager

Cert-Manager facilitates certificate generation for exposed services. In my environment, the API Gateway is annotated in a way that Cert-Manager will automatically generate a TLS Certificate for, using DNS challenges to Azure DNS.

This also includes the required clusterIssuer resource that provides configuration and authentication details

Expose Hubble-UI

A gateway and httproute resource is created to expose the Hubble UI:

Mikrotik BGP Peering Check

Using Winbox, the BGP peering and route propagation can be checked:
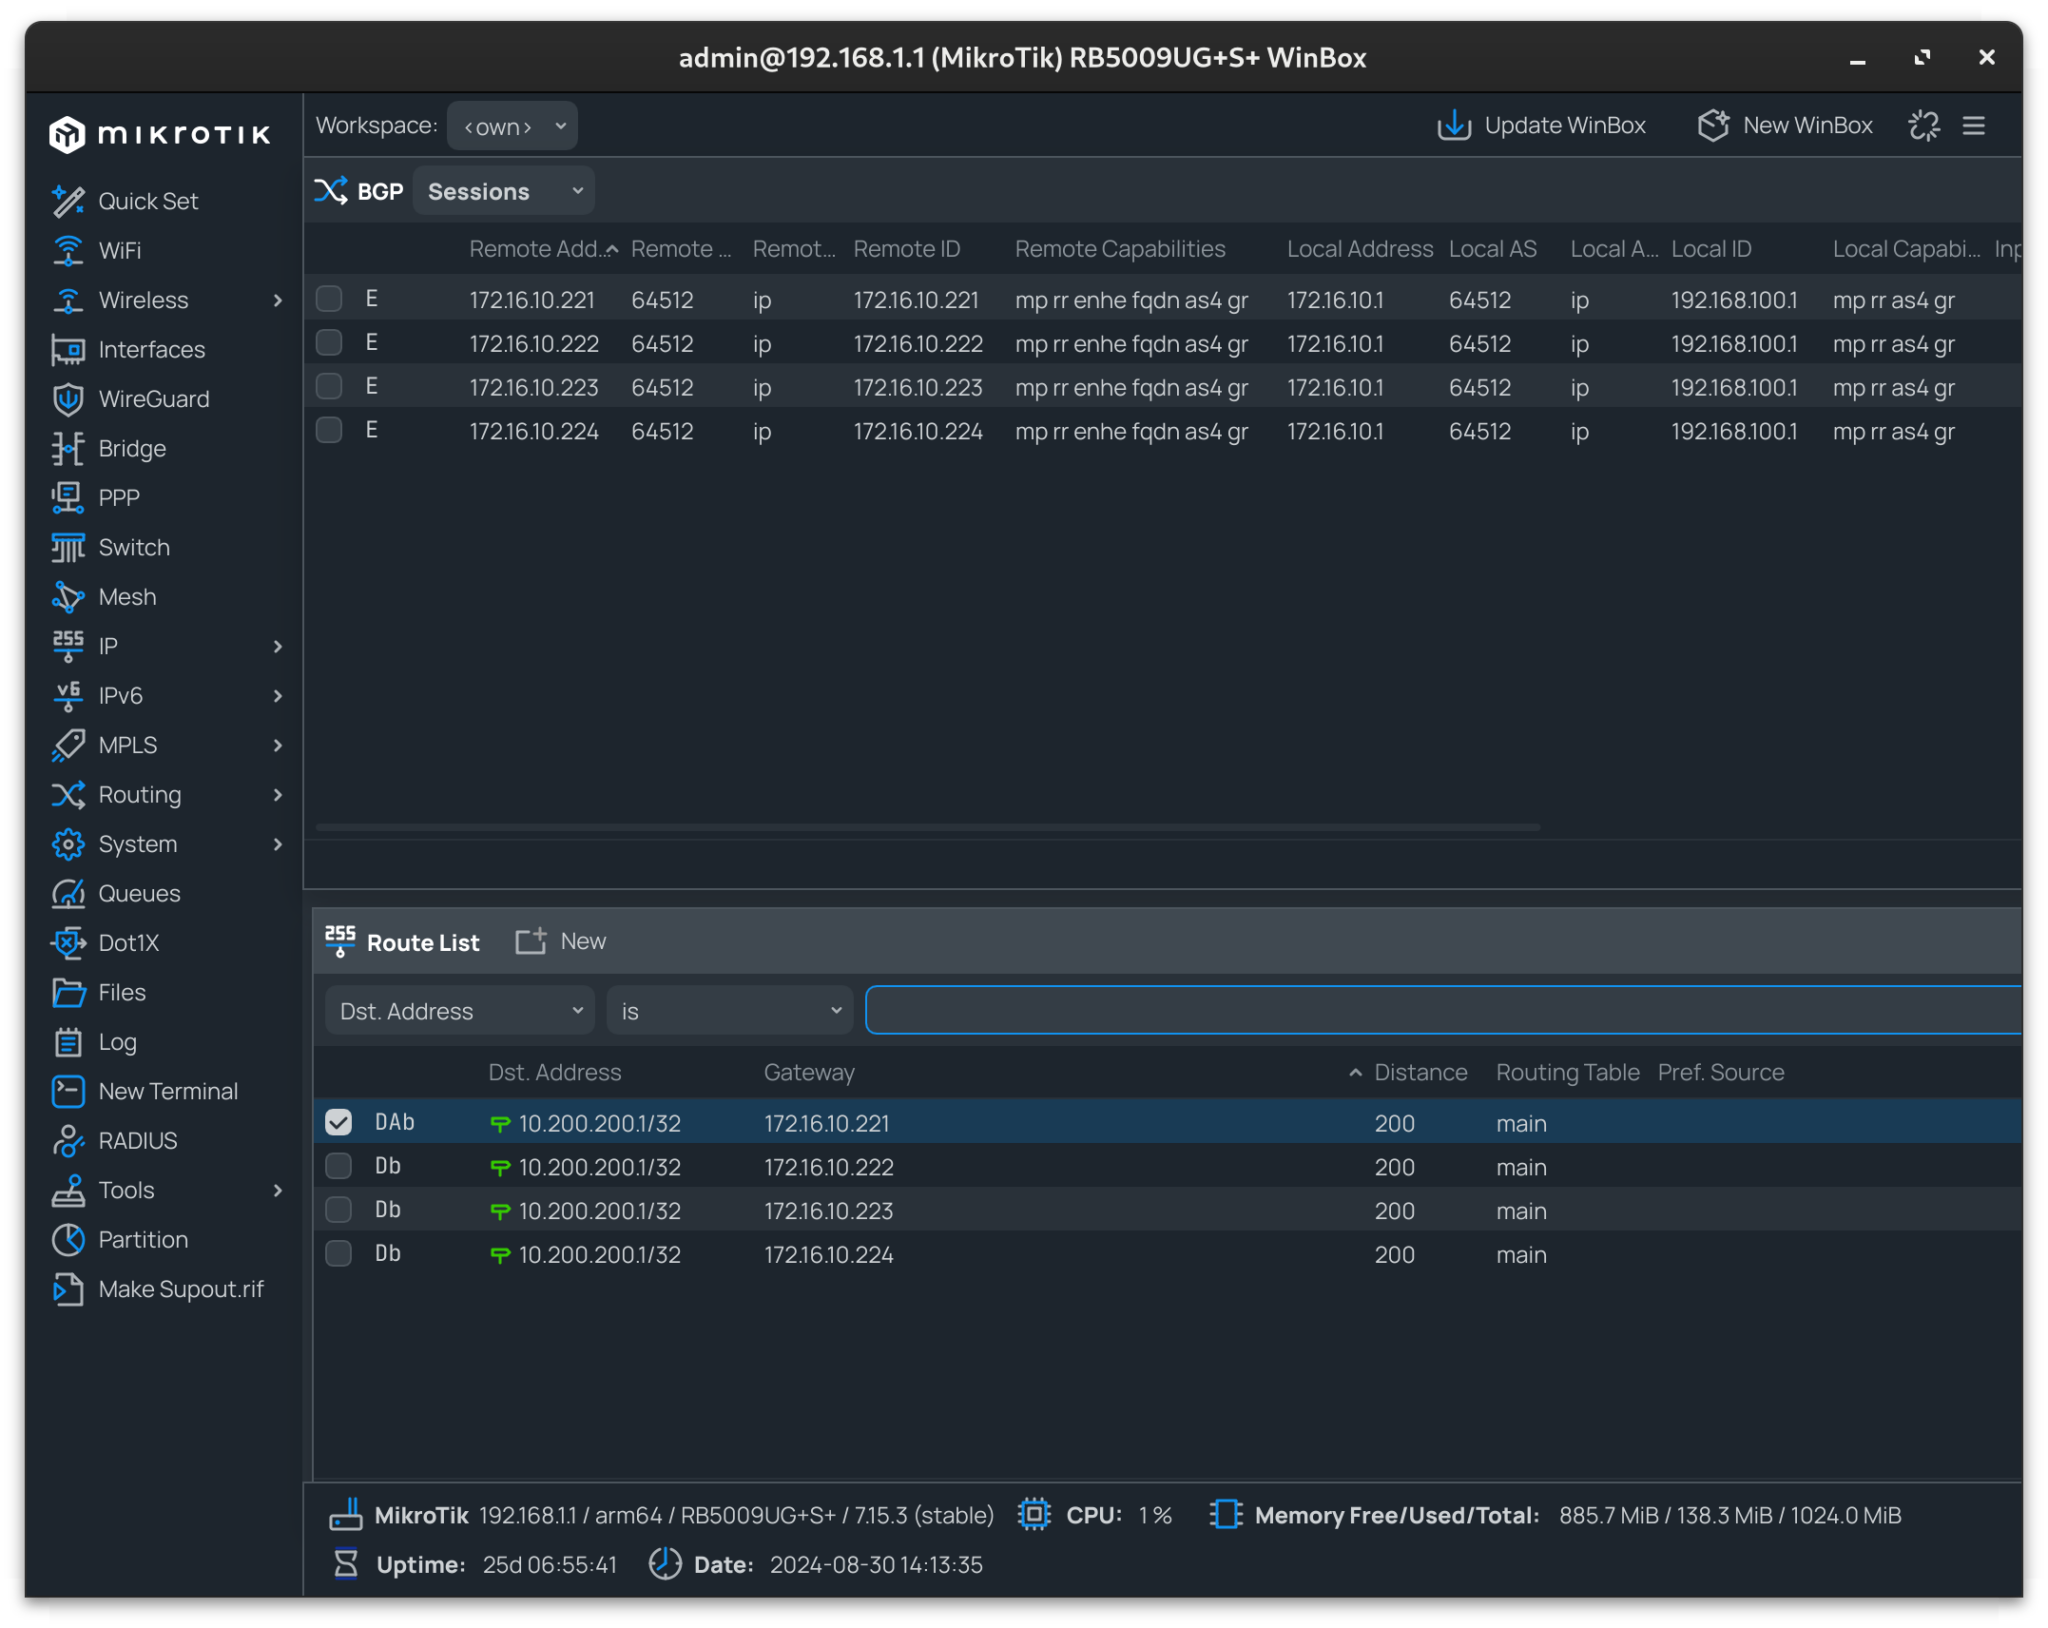
In my instance, 10.200.200.1 resolves to my API Gateway IP, with each node advertising this address.
Replicating my vSphere network configuration in Openshift Virtualisation

Red Hat Openshift Virtualisation provides a platform for running and managing Virtual Machines alongside Containers using a consistent API. It also provides a mechanism for migrating VMs from platforms such as vSphere.

As I have both environments, I wanted to deploy an Openshift Virtualisation setup that mimics my current vSphere setup so I could migrate Virtual Machines to it.

Existing vSphere Design

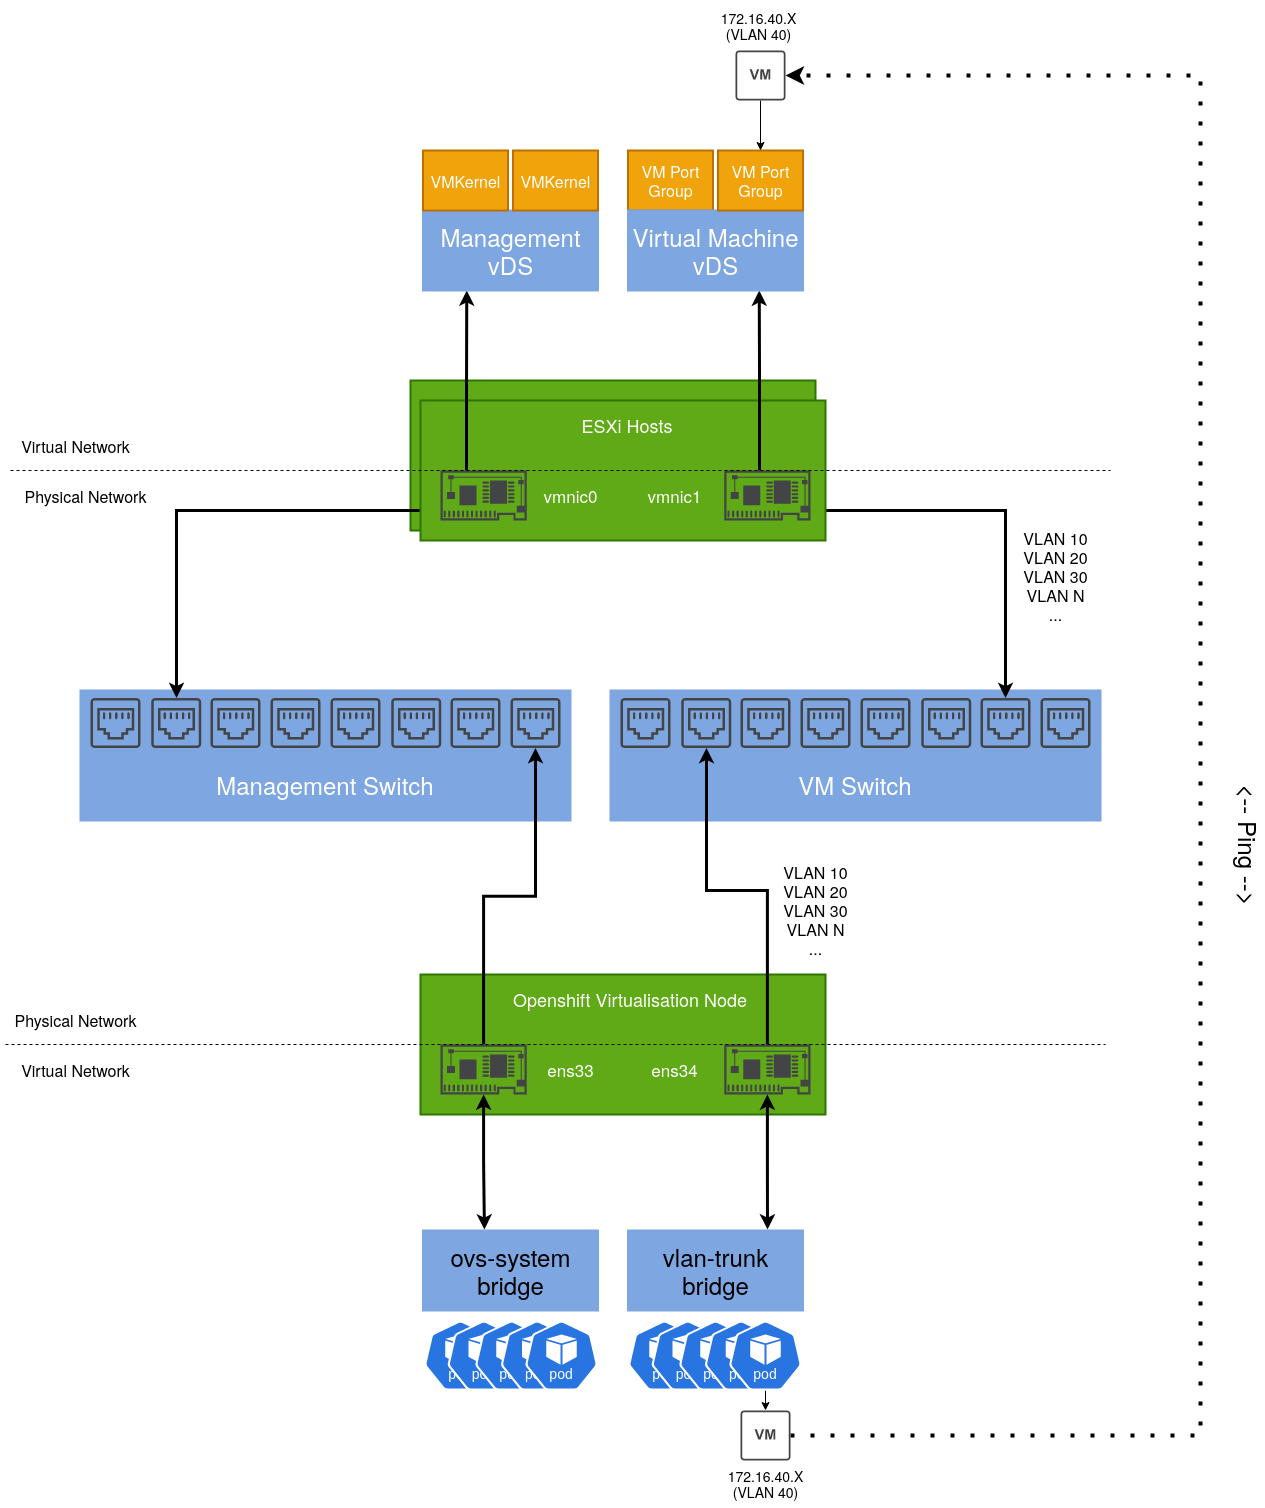
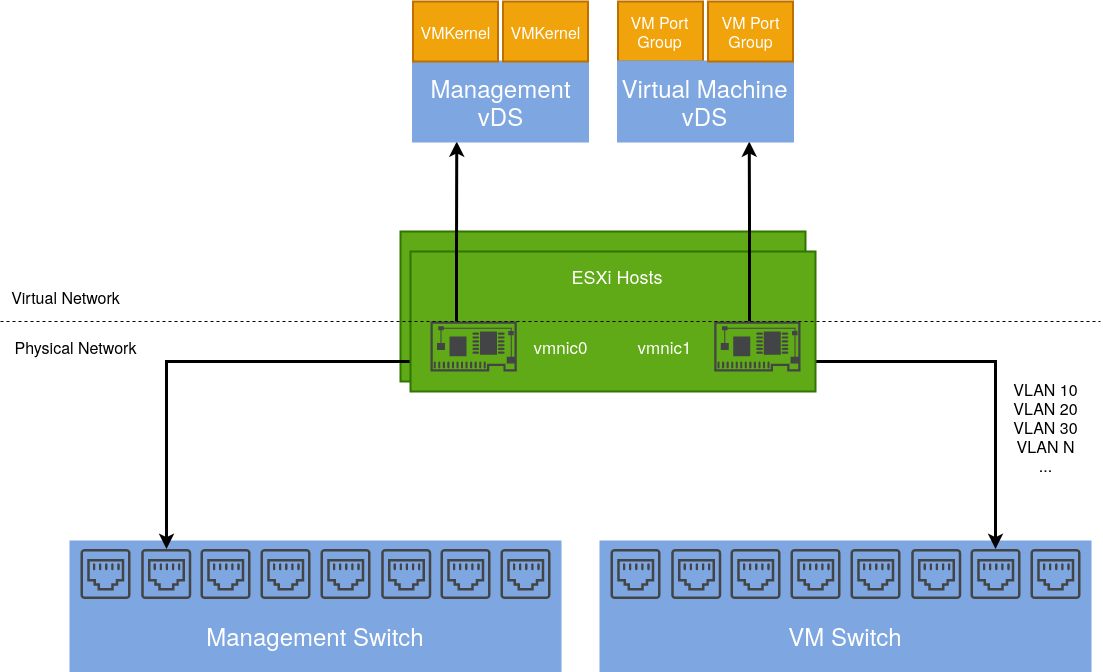
Below is a diagram depicting my current vSphere setup. My ESXi hosts are dual-homed with a separation of management (vmkernel) and virtual machine traffic.

vmnic1 is connected to a trunk port accommodating several different VLANs. These are configured as corresponding port groups in the Distributed Switch.

Integrating an Openshift Virtualisation host

Given an Openshift host with the same number of NICs, we can design a similar solution including a test use case:

By default, an existing bridge (ovs-system) is created by Openshift to facilitate cluster networking. To achieve the same level of isolation configured in the vSphere environment, an additional bridge is required. This will be called vlan-trunk and as the name implies, it will act as a trunk interface for a range of VLAN networks.

Once configured, a Virtual Machine Instance can be created, connected to one of these VLAN networks and reside on the same L2 network as their vSphere-managed VM counterparts.

Configuring the Openshift Node

There are several ways to accomplish this, however for ease, the NMState Operator can be used to configure host networking in a declarative way:

Once installed, a default NMState object needs to be created:

apiVersion: nmstate.io/v1
kind: NMState
metadata:
  name: nmstate
spec: {}

After which we can define an instance of the NodeNetworkConfigurationPolicy object that creates our additional bridge interface and includes a specific NIC.

apiVersion: nmstate.io/v1
kind: NodeNetworkConfigurationPolicy
metadata:
  name: vlan-trunk-ens34-policy
spec:
  desiredState:
    interfaces:
      - name: vlan-trunk
        description: Linux bridge with ens34 as a port
        type: linux-bridge
        state: up
        ipv4:
          enabled: false
        bridge:
          options:
            stp:
              enabled: false
          port:
            - name: ens34

To validate, run ip addr show on the host:

2: ens33: <BROADCAST,MULTICAST,ALLMULTI,UP,LOWER_UP> mtu 1500 qdisc mq master ovs-system state UP group default qlen 1000
    link/ether 00:50:56:bb:e3:c3 brd ff:ff:ff:ff:ff:ff
    altname enp2s1
3: ens34: <BROADCAST,MULTICAST,UP,LOWER_UP> mtu 1500 qdisc mq master vlan-trunk state UP group default qlen 1000
    link/ether 00:50:56:bb:97:0d brd ff:ff:ff:ff:ff:ff
    altname enp2s2

...

653: vlan-trunk: <BROADCAST,MULTICAST,UP,LOWER_UP> mtu 1500 qdisc noqueue state UP group default qlen 1000
    link/ether 00:50:56:bb:97:0d brd ff:ff:ff:ff:ff:ff

In a similar way that Distributed Port groups are created in vSphere, we can create NetworkAttachmentDefinition objects that represent our physical network(s) in software.

The example below is comparable to a Distributed Port Group in vSphere that’s configured to tag traffic with the VLAN ID of 40. If required, we could repeat this process for each VLAN/Distributed Port group so we have a 1:1 mapping between both the vSphere and Openshift Virtualisation environments.

apiVersion: k8s.cni.cncf.io/v1
kind: NetworkAttachmentDefinition
metadata:
  annotations:
    k8s.v1.cni.cncf.io/resourceName: bridge.network.kubevirt.io/vlan-trunk
  name: vm-vlan-40
  namespace: openshift-nmstate
spec:
  config: '{"name":"vm-vlan-40","type":"cnv-bridge","cniVersion":"0.3.1","bridge":"vlan-trunk","vlan":40,"macspoofchk":true,"ipam":{},"preserveDefaultVlan":false}'

Which can be referenced when creating a VM:

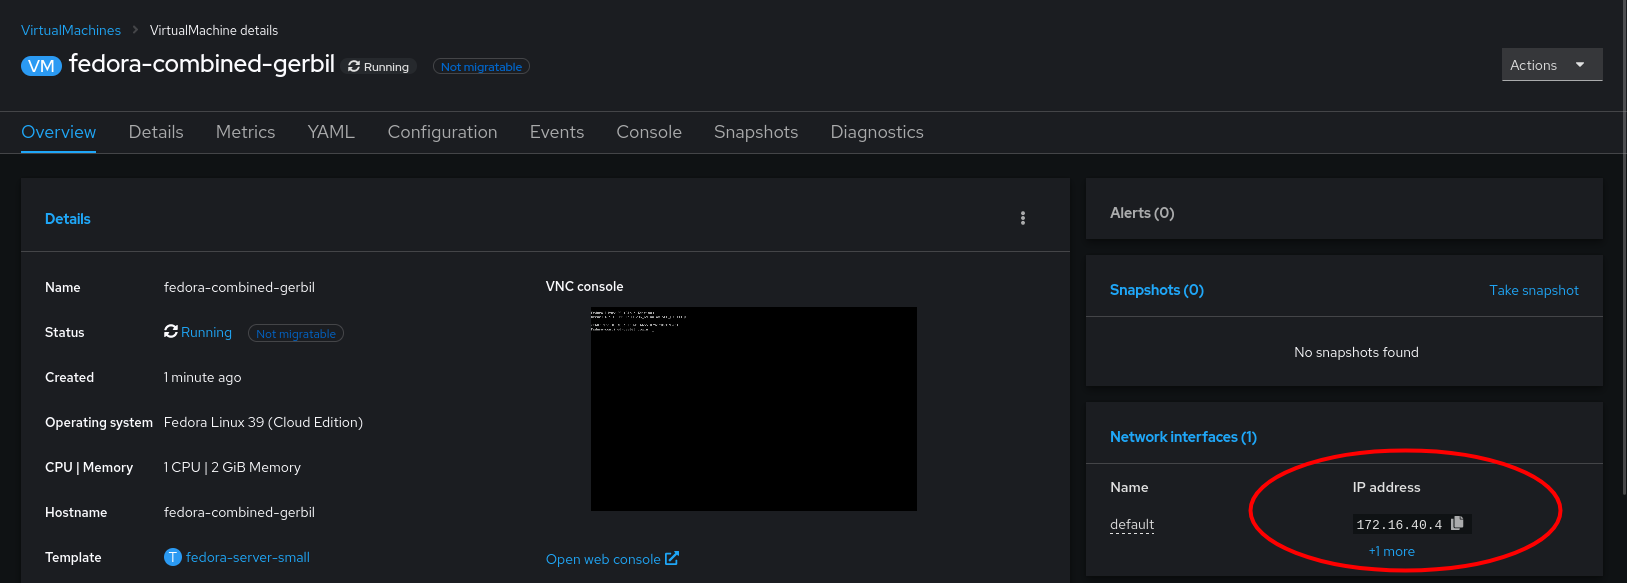
After a short period, the VM’s IP address will be reported to the console. In my example, I have a DHCP server running on that VLAN, which is how this VM acquired its IP address:

Which we can test connectivity from another machine with ping. such as a VM running on an ESXi Host:

sh-5.1# ping 172.16.40.4
PING 172.16.40.4 (172.16.40.4) 56(84) bytes of data.
64 bytes from 172.16.40.4: icmp_seq=1 ttl=63 time=1.42 ms
64 bytes from 172.16.40.4: icmp_seq=2 ttl=63 time=0.960 ms
64 bytes from 172.16.40.4: icmp_seq=3 ttl=63 time=0.842 ms
64 bytes from 172.16.40.4: icmp_seq=4 ttl=63 time=0.967 ms
64 bytes from 172.16.40.4: icmp_seq=5 ttl=63 time=0.977 ms

By taking this approach, we can gradually start migrating VM’s from vSphere to Openshift Virtualisation with minimal disruption, which I will cover in a subsequent post.

Changing the default apps wildcard certificate in OCP4

In a standard OCP4 installation, several route objects are created by default and secured with a internally signed wildcard certificate.

These routes are configured as <app-name>.apps.<domain>. In my example, I have a cluster with the assigned domain ocp-acm.virtualthoughts.co.uk, which results in the routes below:

oauth-openshift.apps.ocp-acm.virtualthoughts.co.uk
console-openshift-console.apps.ocp-acm.virtualthoughts.co.uk
grafana-openshift-monitoring.apps.ocp-acm.virtualthoughts.co.uk
thanos-querier-openshift-monitoring.apps.ocp-acm.virtualthoughts.co.uk
prometheus-k8s-openshift-monitoring.apps.ocp-acm.virtualthoughts.co.uk
alertmanager-main-openshift-monitoring.apps.ocp-acm.virtualthoughts.co.uk

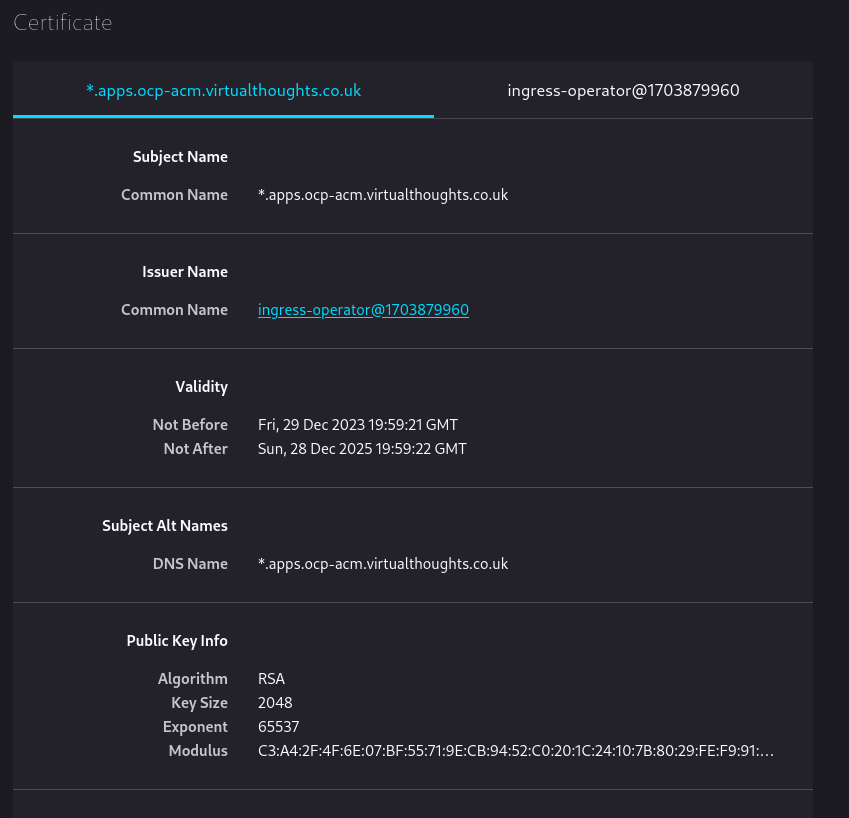
Inspecting console-openshift-console.apps.ocp-acm.virtualthoughts.co.uk shows us the default wildcard TLS certificate used by the Ingress Operator:

Because it’s internally signed, it’s not trusted by default by external clients. However, this can be changed.

Installing Cert-Manager

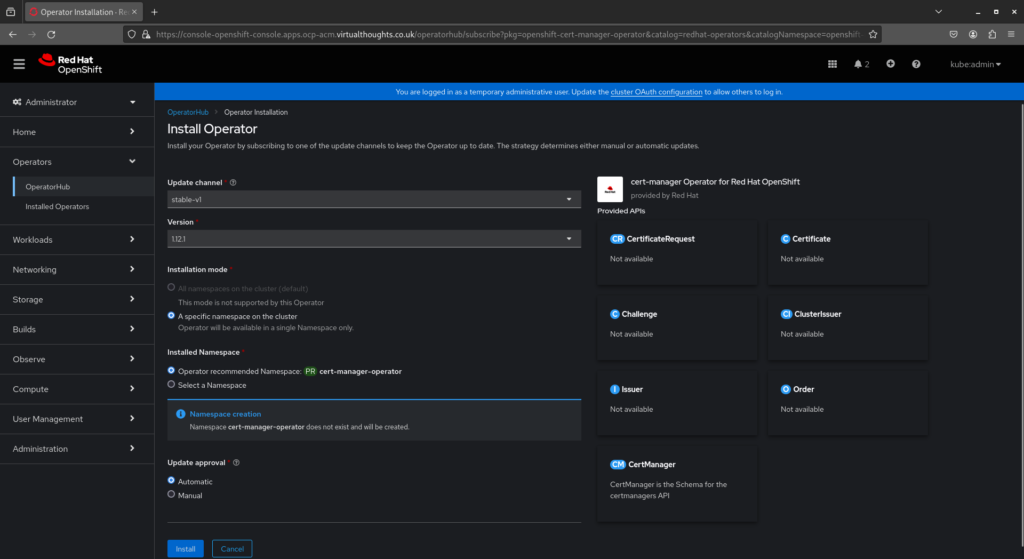
OperatorHub includes the upstream cert-manager chart, as well as one maintained by Red Hat. This can be installed to manage the lifecycle of our new certificate. Navigate to Operators -> Operator Hub -> cert-manager and install.

Create Secret, Issuer and Certificate resources

With Cert-Manager installed, we need to provide configuration so it knows how to issue challenges and generate certificates. In this example:

  • Secret – A client secret created from my cloud provider for authentication used to satisfy the challenge type. In this example AzureDNS, as I’m using the DNS challenge request type to prove ownership of this domain.
  • ClusterIssuer – A cluster wide configuration that when referenced, determines how to get (issue) certs. You can have multiple Issuers in a cluster, namespace or cluster scoped pointing to different providers and configurations.
  • Certificate – TLS certs can be generated automatically from ingress annotations, however in this example, it is used to request and store the certificate in its own lifecycle, not tied to a specific ingress object.

Let’s Encrypt provides wildcard certificates, but only through the DNS-01 challenge. The HTTP-01 challenge cannot be used to issue wildcard certificates. This is reflected in the config:

apiVersion: v1
kind: Secret
metadata:
  name: azuredns-config
  namespace: cert-manager
type: Opaque
data:
  client-secret: <Base64 Encoded Secret from Azure>
---
apiVersion: cert-manager.io/v1
kind: ClusterIssuer
metadata:
  name: letsencrypt-production
  namespace: cert-manager
spec:
  acme:
    server: https://acme-v02.api.letsencrypt.org/directory
    email: <email>
    privateKeySecretRef:
      name: letsencrypt
    solvers:
    - dns01:
        azureDNS:
          clientID: <clientID>
          clientSecretSecretRef:
            name: azuredns-config
            key: client-secret
          subscriptionID: <subscriptionID>
          tenantID: <tenantID>
          resourceGroupName: <resourceGroupName>
          hostedZoneName: virtualthoughts.co.uk
          # Azure Cloud Environment, default to AzurePublicCloud
          environment: AzurePublicCloud
---
apiVersion: cert-manager.io/v1
kind: Certificate
metadata:
  name: wildcard-apps-certificate
  namespace: openshift-ingress
spec:
  secretName: apps-wildcard-tls
  issuerRef:
    name: letsencrypt-production
    kind: ClusterIssuer
  commonName: "*.apps.ocp-acm.virtualthoughts.co.uk"
  dnsNames:
  - "*.apps.ocp-acm.virtualthoughts.co.uk"

Applying the above will create the respective objects required for us to request, receive and store a wildcard certificate from LetsEncrypt, using the DNS challenge request with AzureDNS.

The certificate may take ~2mins or so to become Ready due to the nature of the DNS style challenge.

oc get cert -A

NAMESPACE           NAME                        READY   SECRET              AGE
openshift-ingress   wildcard-apps-certificate   True    apps-wildcard-tls   33m

Patch the Ingress Operator

With the certificate object created, the Ingress Operator needs re configuring, referencing the secret name of the certificate object for our new certificate:

oc patch ingresscontroller.operator default \
--type=merge -p \
'{"spec":{"defaultCertificate":{"name":"apps-wildcard-tls"}}}' \
--namespace=openshift-ingress-operator

Validate

After applying, navigating back to the clusters console will present the new wildcard cert:

« Older posts

© 2025 Virtual Thoughts

Theme by Anders NorenUp ↑

Social media & sharing icons powered by UltimatelySocial
RSS
Twitter
Visit Us
Follow Me