Virtualisation, Storage and various other ramblings.

Category: Cloud (Page 3 of 9)

Debugging cloud-init not executing runcmd commands

Background

Rancher leverages cloud-init for the provisioning of Virtual Machines on a number of infrastructure providers, as below:

I recently encountered an issue whereby vSphere based clusters using an Ubuntu VM template would successfully provision, but SLES based VM templates would not.

What does Rancher use cloud-init for?

This is covered in the Masterclass session I co-hosted, but as a refresher, particularly with the vSphere driver, Rancher will mount an ISO image to the VM to deliver the user-data portion of a cloud-init configuration. The contents of which look like this:

#cloud-config
groups:
- staff
hostname: scale-aio-472516f5-s82pz
runcmd:
- sh /usr/local/custom_script/install.sh
set_hostname:
- scale-aio-472516f5-s82pz
users:
- create_groups: false
  groups: staff
  lock_passwd: true
  name: docker
  no_user_group: true
  ssh_authorized_keys:
  - |
    ssh-rsa AAAAB3NzaC1yc.......
  sudo: ALL=(ALL) NOPASSWD:ALL
write_files:
- content: H4sIAAAAAAAA/wAAA...........
  encoding: gzip+b64
  path: /usr/local/custom_script/install.sh
  permissions: "0644"

Note: This is automatically generated, any additional cloud-init config you include in the cluster configuration (below) gets merged with the above.

It saves a script with write_files and then runs this with runcmd – this will install the rancher-system-agent service and begin the process of installing RKE2/K3s.

The Issue

When I provisioned SLES based clusters using my existing Packer template, Rancher would indicate it was waiting for the agent to check in:

Investigating

Thinking cloud-init didn’t ingest the config, I ssh’d into the node to do some debugging. I noticed that the node name had changed:

sles-15-sp3-pool1-15a47a8f-xcspb:~ #

Which I verified with:

sles-15-sp3-pool1-15a47a8f-xcspb:/ # cat /var/lib/cloud/instance/user-data.txt | grep hostname
hostname: sles-15-sp3-pool1-15a47a8f-xcspb

Inspecting user-data.txt from that directory also matched what was in the mounted ISO. I could also see /usr/local/custom_script/install.sh was created, but nothing indicated that it was executed. It appeared everything else from the cloud-init file was processed – SSH keys, groups, writing the script, etc, but nothing from runcmd was executed.

I ruled out the script by creating a new cluster and adding my own command:

As expected, this was merged into the user-data.iso file mounted to the VM, but /tmp/test.txt didn’t exist, so it was never executed.

Checking cloud-init logs

Cloud-Init has an easy way to collect logs – the cloud-init collect-logs command, This will generate a tarball:

sles-15-sp3-pool1-15a47a8f-xcspb:/ # cloud-init collect-logs
Wrote /cloud-init.tar.gz

I noted in cloud-init.log I could see the script file being saved:

2023-01-18 09:56:22,917 - helpers.py[DEBUG]: Running config-write-files using lock (<FileLock using file '/var/lib/cloud/instances/nocloud/sem/config_write_files'>)
2023-01-18 09:56:22,927 - util.py[DEBUG]: Writing to /usr/local/custom_script/install.sh - wb: [644] 29800 bytes
2023-01-18 09:56:22,928 - util.py[DEBUG]: Changing the ownership of /usr/local/custom_script/install.sh to 0:0

But nothing indicating it was executed.

I decided to extrapolate a list of all the cloud-init modules that were initiated:

cat cloud-init.log | grep "Running module"

stages.py[DEBUG]: Running module migrator
stages.py[DEBUG]: Running module seed_random 
stages.py[DEBUG]: Running module bootcmd 
stages.py[DEBUG]: Running module write-files 
stages.py[DEBUG]: Running module growpart 
stages.py[DEBUG]: Running module resizefs 
stages.py[DEBUG]: Running module disk_setup
stages.py[DEBUG]: Running module mounts 
stages.py[DEBUG]: Running module set_hostname
stages.py[DEBUG]: Running module update_hostname 
stages.py[DEBUG]: Running module update_etc_hosts 
stages.py[DEBUG]: Running module rsyslog 
stages.py[DEBUG]: Running module users-groups 
stages.py[DEBUG]: Running module ssh

But still, no sign of runcmd.

Checking cloud-init configuration

Outside of the log bundle, /etc/cloud/cloud.cfg includes the configuration for cloud-init. having suspected the runcmd module may not be loaded, I checked, but it was present:

# The modules that run in the 'config' stage
cloud_config_modules:
 - ssh-import-id
 - locale
 - set-passwords
 - zypper-add-repo
 - ntp
 - timezone
 - disable-ec2-metadata
 - runcmd

However, I noticed that nothing from the cloud_config_modules block was mentioned in cloud-init.log. However, everything from cloud_init_modules was:

# The modules that run in the 'init' stage
cloud_init_modules:
 - migrator
 - seed_random
 - bootcmd
 - write-files
 - growpart
 - resizefs
 - disk_setup
 - mounts
 - set_hostname
 - update_hostname
 - update_etc_hosts
 - ca-certs
 - rsyslog
 - users-groups
 - ssh

So, it appeared the entire cloud_config_modules step wasn’t running. Weird.

Fixing

After speaking with someone from the cloud-init community, I found out that there are several cloud-init services that exist on a host machine. Each dedicated to a specific step.

Default config on SLES 15 SP4 machine:

sles-15-sp3-pool1-15a47a8f-xcspb:/ # sudo systemctl list-unit-files | grep cloud
cloud-config.service                    disabled        disabled     
cloud-final.service                     disabled        disabled     
cloud-init-local.service                disabled        disabled     
cloud-init.service                      enabled         disabled     
cloud-config.target                     static          -            
cloud-init.target                       enabled-runtime disabled

Default config on a Ubuntu 22.04 machine:

packerbuilt@SRV-RNC-1:~$ sudo systemctl list-unit-files | grep cloud
cloud-config.service                        enabled         enabled
cloud-final.service                         enabled         enabled
cloud-init-hotplugd.service                 static          -
cloud-init-local.service                    enabled         enabled
cloud-init.service                          enabled         enabled
cloud-init-hotplugd.socket                  enabled         enabled
cloud-config.target                         static          -
cloud-init.target                           enabled-runtime enabled

The cloud-config service was not enabled and therefore would not run any of the related modules. To rectify, I added the following to my Packer script when building the template:

# Ensure cloud-init services are enabled
systemctl enable cloud-init.service
systemctl enable cloud-init-local.server
systemctl enable cloud-config.service
systemctl enable cloud-final.service

After which, provisioning SLES based machines from Rancher worked.
Evaluating Harvester in vSphere

Disclaimer – The use of nested virtualisation is not a supported topology

Harvester is an open-source HCI solution aimed at managing Virtual Machines, similar to vSphere and Nutanix, with key differences including (but not limited to):

  • Fully Open Source
  • Leveraging Kubernetes-native technologies
  • Integration with Rancher

Testing/evaluating any hyperconverged solution can be difficult – It usually requires having dedicated hardware as these solutions are designed to work directly on bare metal. However, we can circumvent this by leveraging nested virtualisation – something which may be familiar with a lot of homelabbers (myself included) – which involves using an existing virtualisation solution provision workloads that also leverage virtualisation technology.

Step 1 – Planning

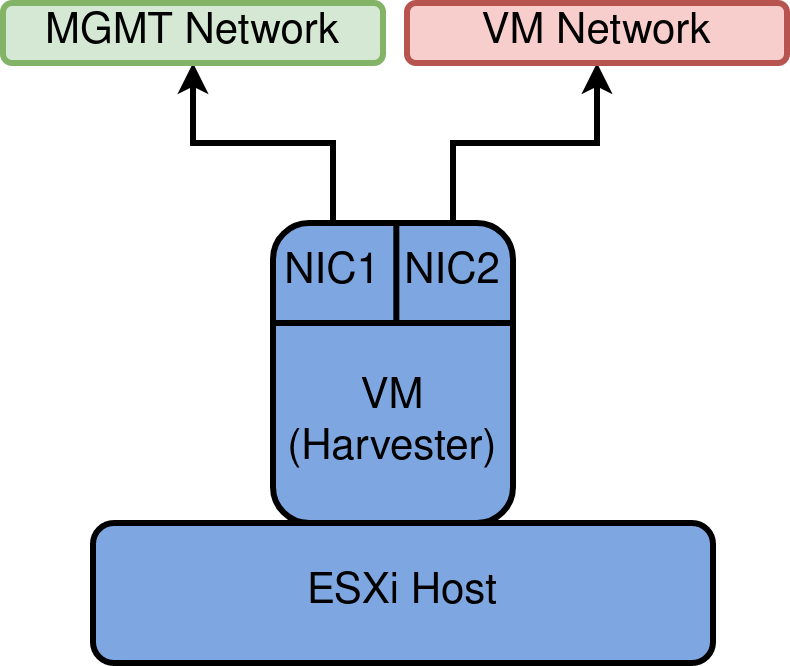
To mimic what a production-like system may look like, two NICs will be leveraged – one that facilitates management traffic, and the other for Virtual Machine traffic, as depicted below

MGMT network and VM Network will manifest as VDS Port groups.

Also, download and make available the latest ISO for harvester

Step 2 – Create vDS Port Groups

It is highly recommended to create new Distributed Port groups for this exercise, mainly because of the configuration we will be applying in the next step.

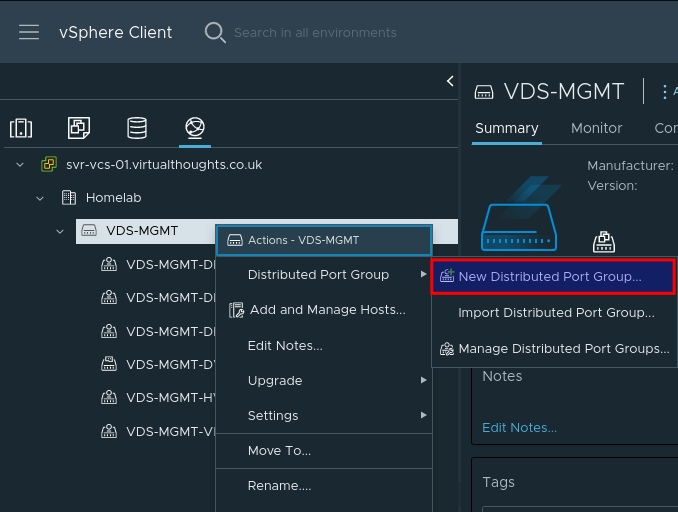
Create a new vDS Port Group:

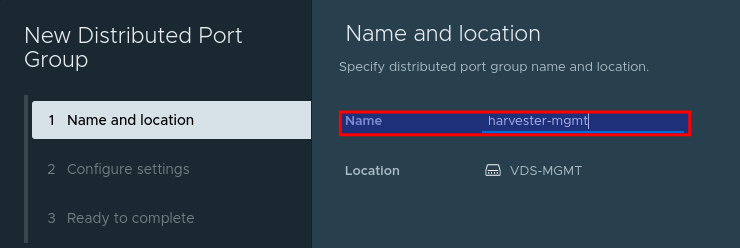
Give the port group a name, such as harvester-mgmt

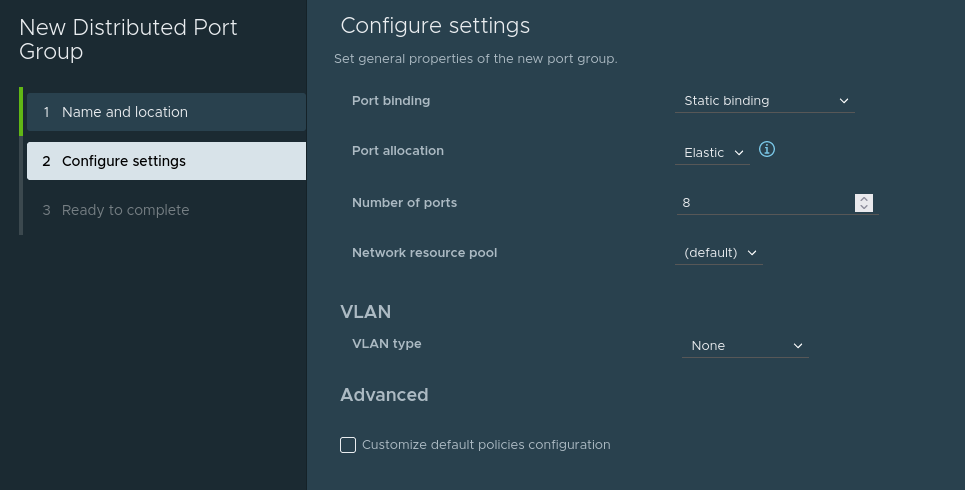
Adjust any configuration (ie VLAN ID) to match your environment (if required). Or accept the defaults:

Repeat this process to create the harvester-vm Port group. We should now have two port groups:

  • harvester-mgmt
  • harvester-vm

Step 3 – Enable MAC learning on Port groups [Critical]

William Lam has an excellent post on how to accomplish this. This is required for Harvester (or any hypervisor) to function correctly when operating in a nested environment.

Set-MacLearn -DVPortgroupName @("harvester-mgmt") -EnableMacLearn $true -EnablePromiscuous $false -EnableForgedTransmit $true -EnableMacChange $false

Set-MacLearn -DVPortgroupName @("harvester-vm") -EnableMacLearn $true -EnablePromiscuous $false -EnableForgedTransmit $true -EnableMacChange $false

Step 4 – Creating a Harvester VM

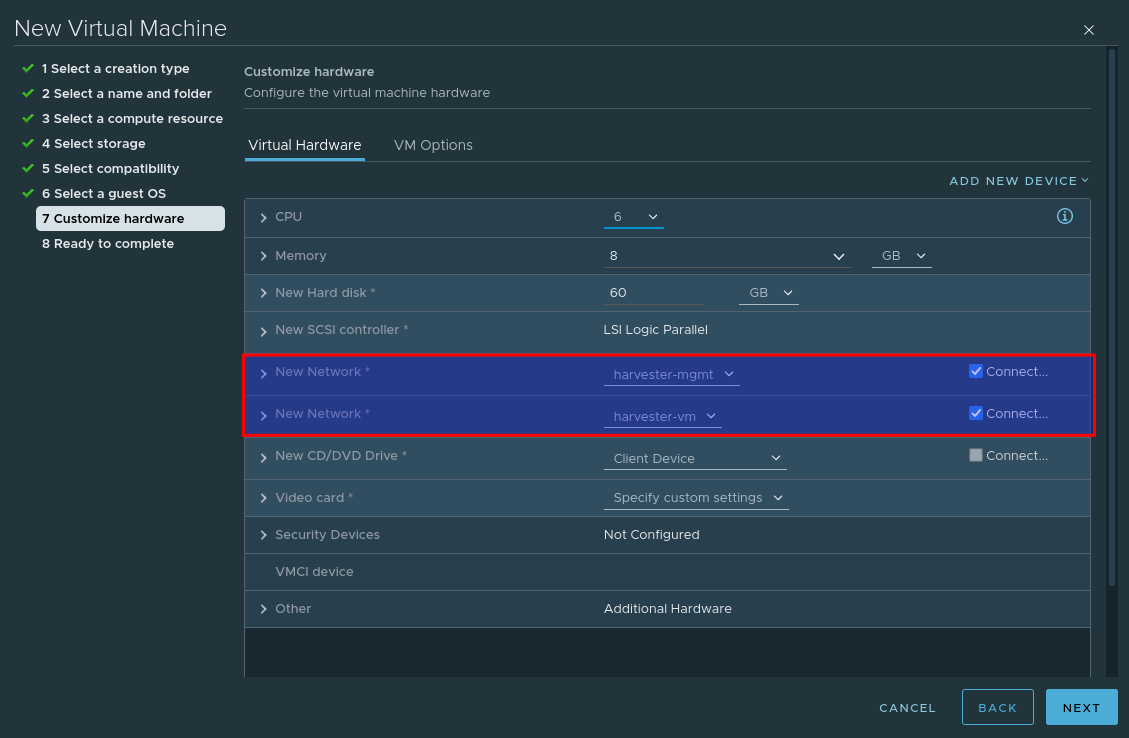
Our Harvester VM will operate like any other VM, with some important differences. In vSphere, go through the standard VM creation wizard to specify the Host/Datastore options. When presented with the OS type, select Other Linux (64 bit).

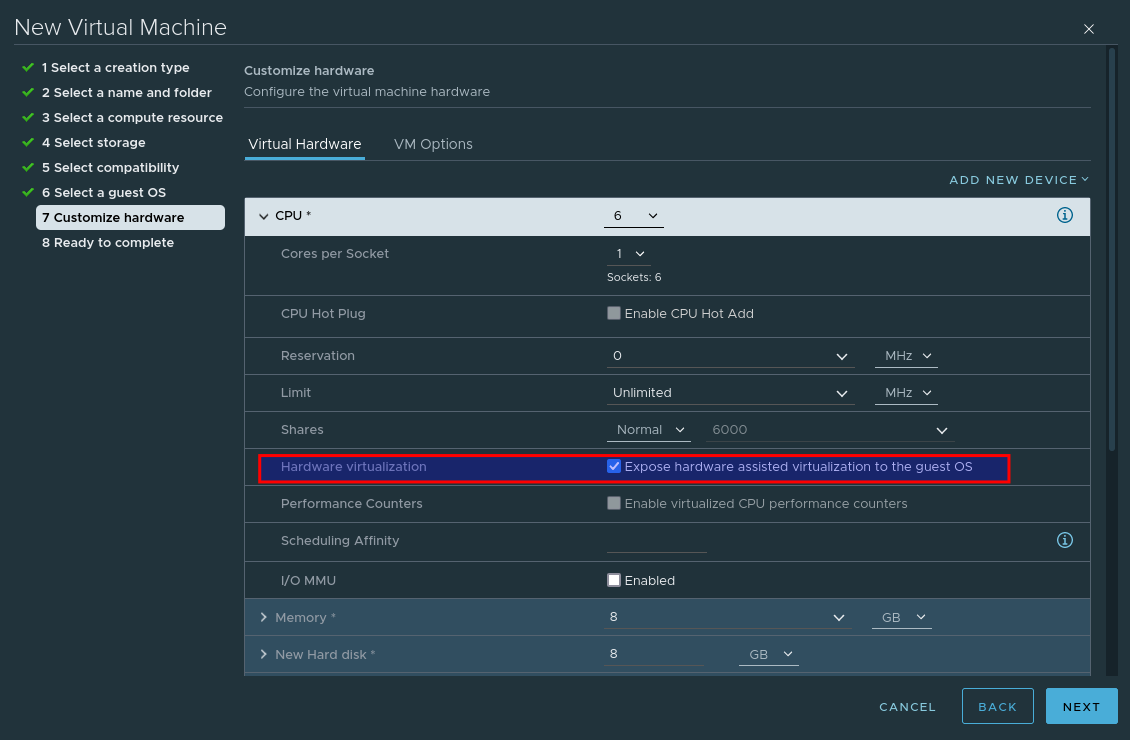
When customising the hardware, select Expose hardware assisted virtualization to the guest OS – This is crucial, as without this selected Harvester will not install.

Add an additional network card so that our VM leverages both previously created port groups:

And finally, mount the Harvester ISO image.

Step 4 – Install Harvester

Power on the VM and providing the ISO is mounted and connected, you should be presented with the install screen. As this is the first node, select create a new Harvester Cluster

Select the Install target and optional MBR partitioning

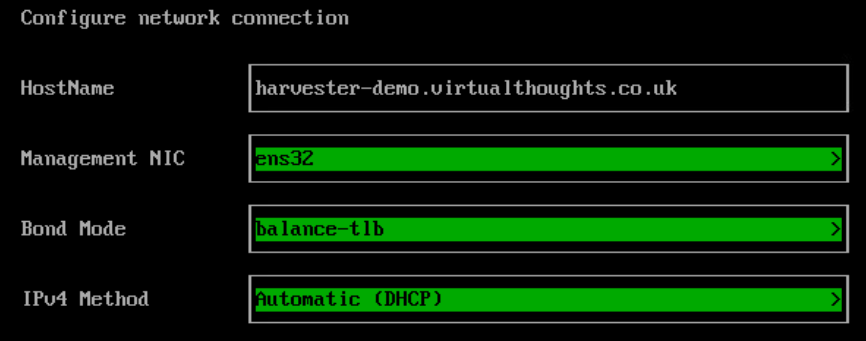
Configure the hostname, management nic and IP assignment options.

Configure the DNS config:

Configure the Harvester VIP. This is what we will use to access the Web UI. This can also be obtained via DHCP if desired.

Configure the cluster token, this is required if you want to add more nodes later on.

Configure the local Password:

Configure the NTP server Address:

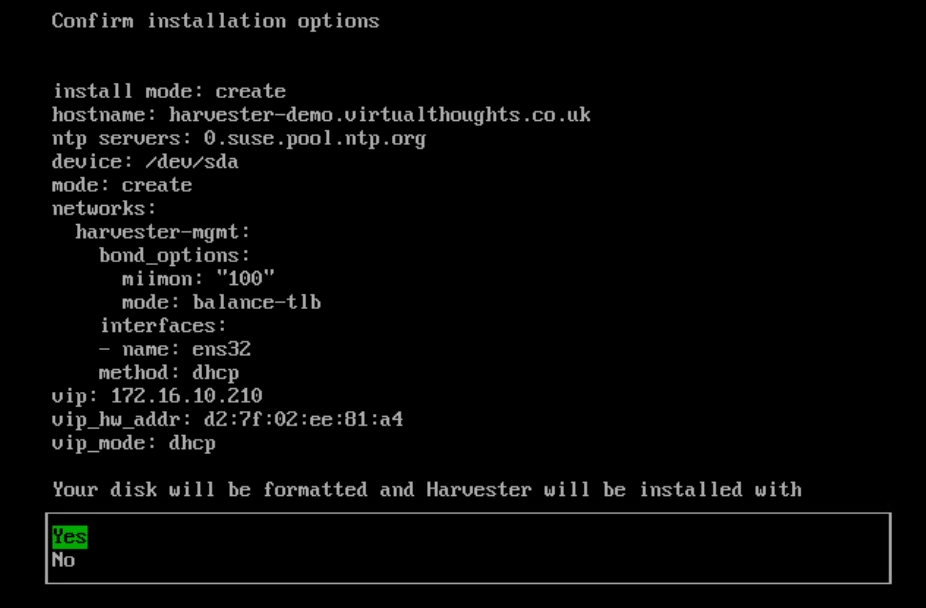
If desired, the subsequent options facilitate importing SSH keys, reading a remote config, etc which are optional. A summary will be presented before the install begins:

Proceed with the install.

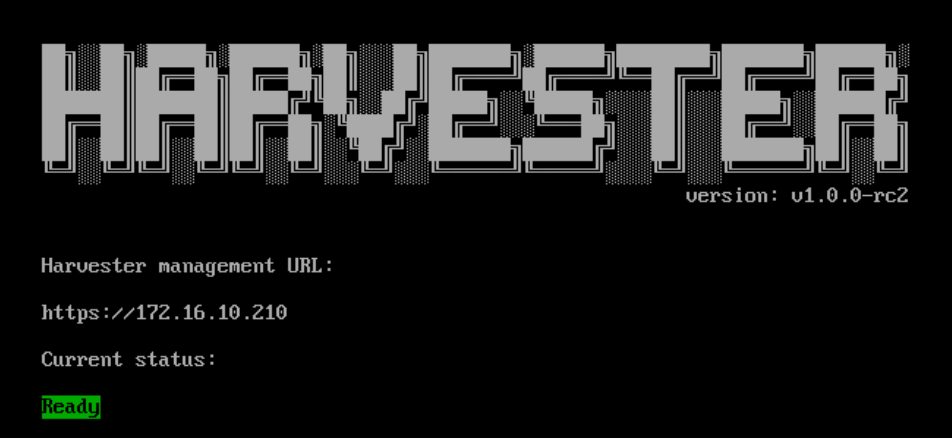
Note : After a reboot, it may take a few minutes before harvester reports as being in a ready state – Once it does, navigate to the reported management URL.

At which point you will be prompted to reset the admin password

Step 5 – Configure VM Network

Once logged in to Harvester navigate to Hosts > Edit Config

Configure the secondary NIC to the VLAN network (our VM network)

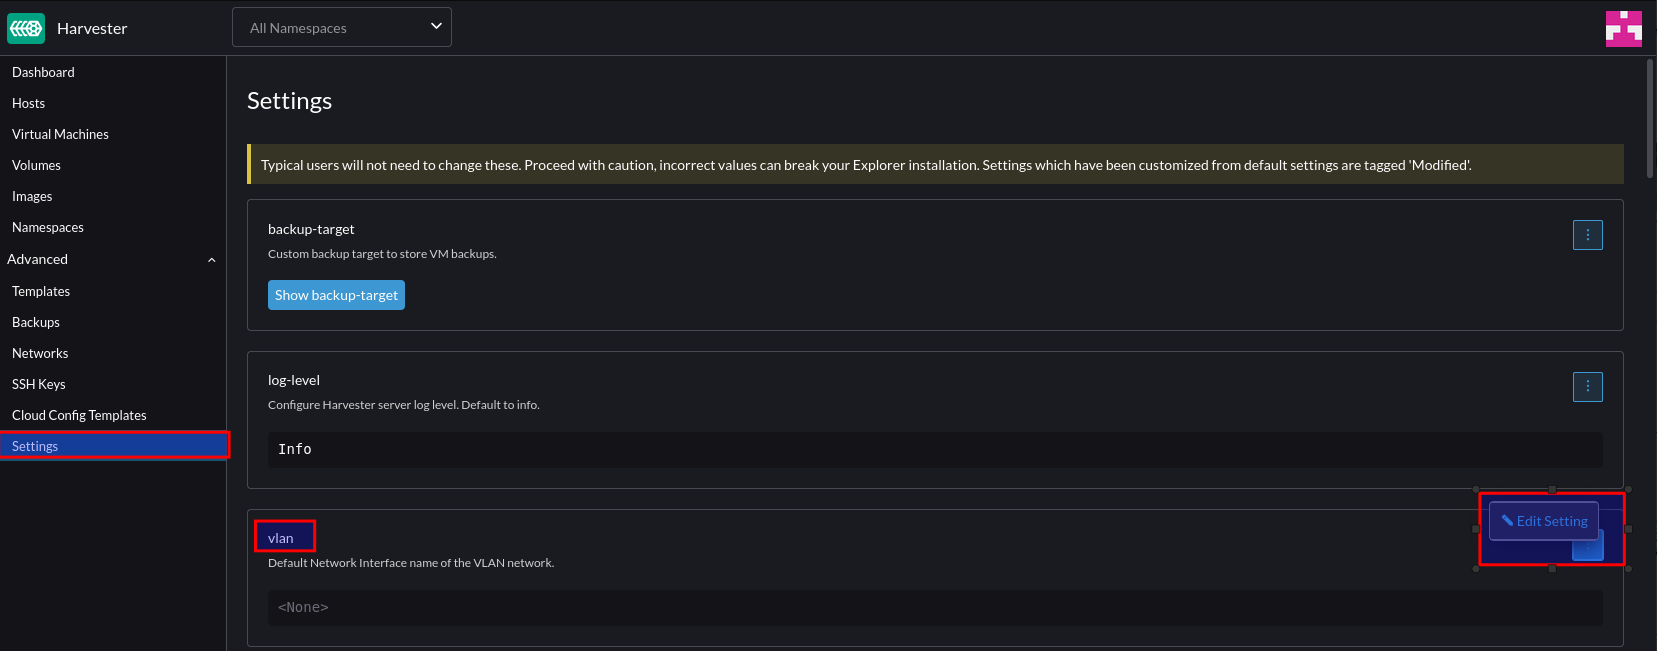
Navigate to Settings > VLAN > Edit

Click “Enable” and select the default interface to the secondary interface. This will be the default for any new nodes that join the cluster.

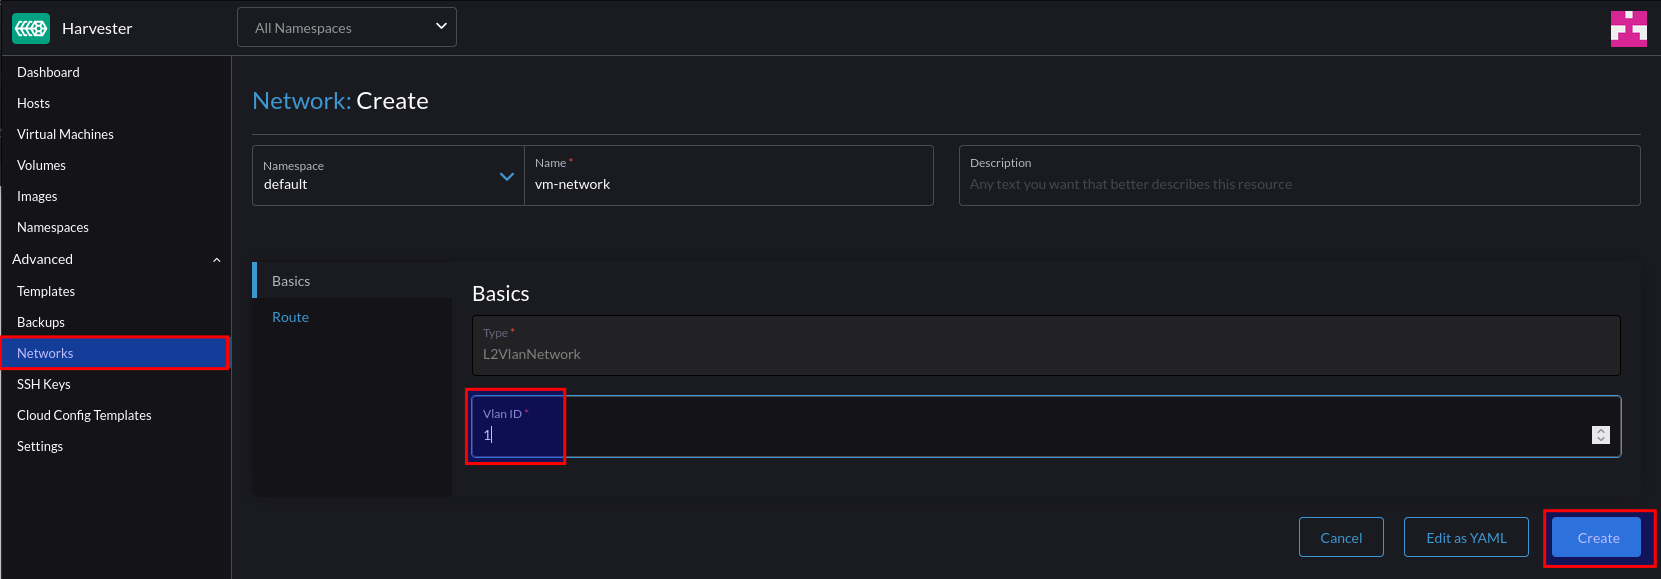
To create a network for our VM’s to reside in, select Network > Create:

Give this network a name and a VLAN ID. Note – you can supply VLAN ID 1 if you’re using the native/default VLAN.

Step 6 – Test VM Network

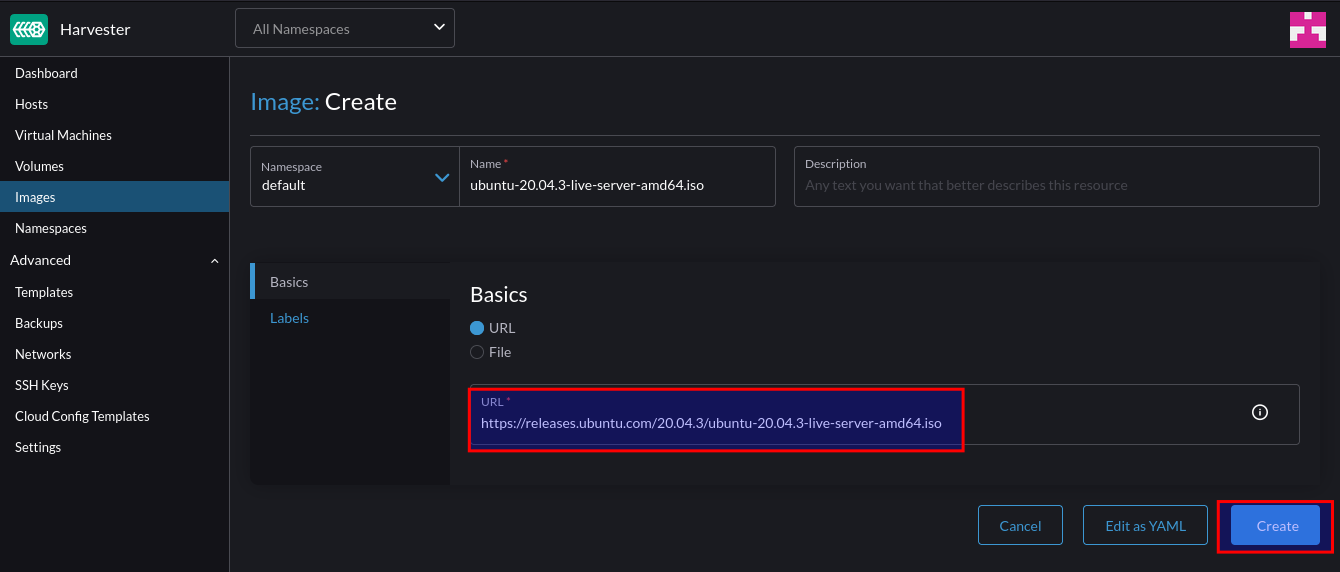
Firstly, create a new image:

For this example, we can use an ISO image. After supplying the URL Harvester will download and store the image:

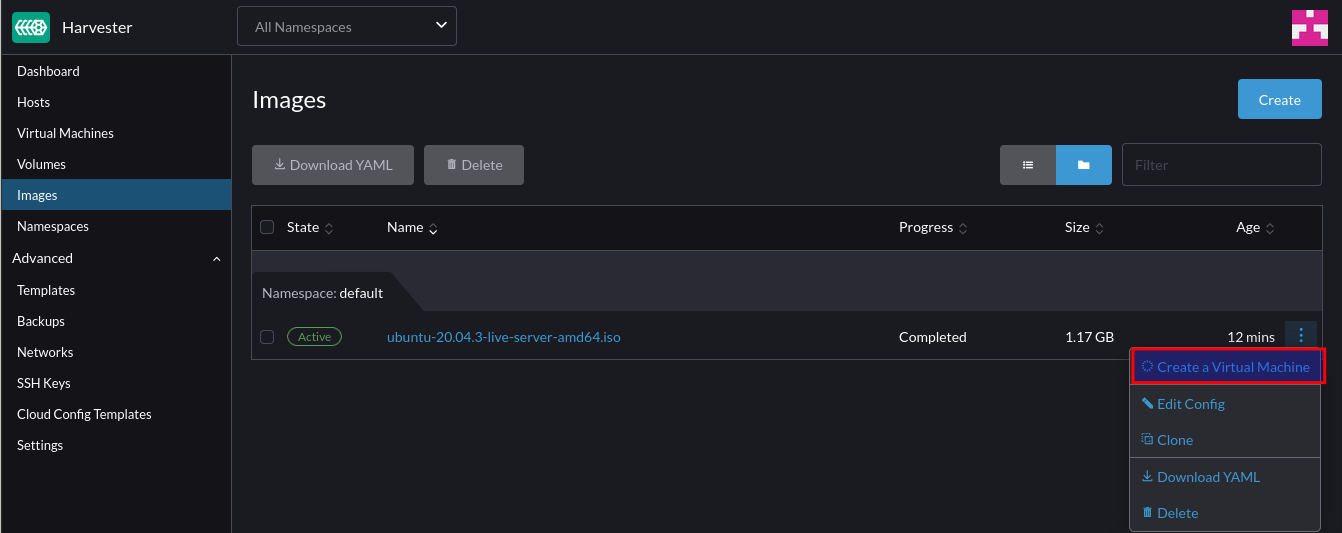
After downloading, we can create a VM from it:

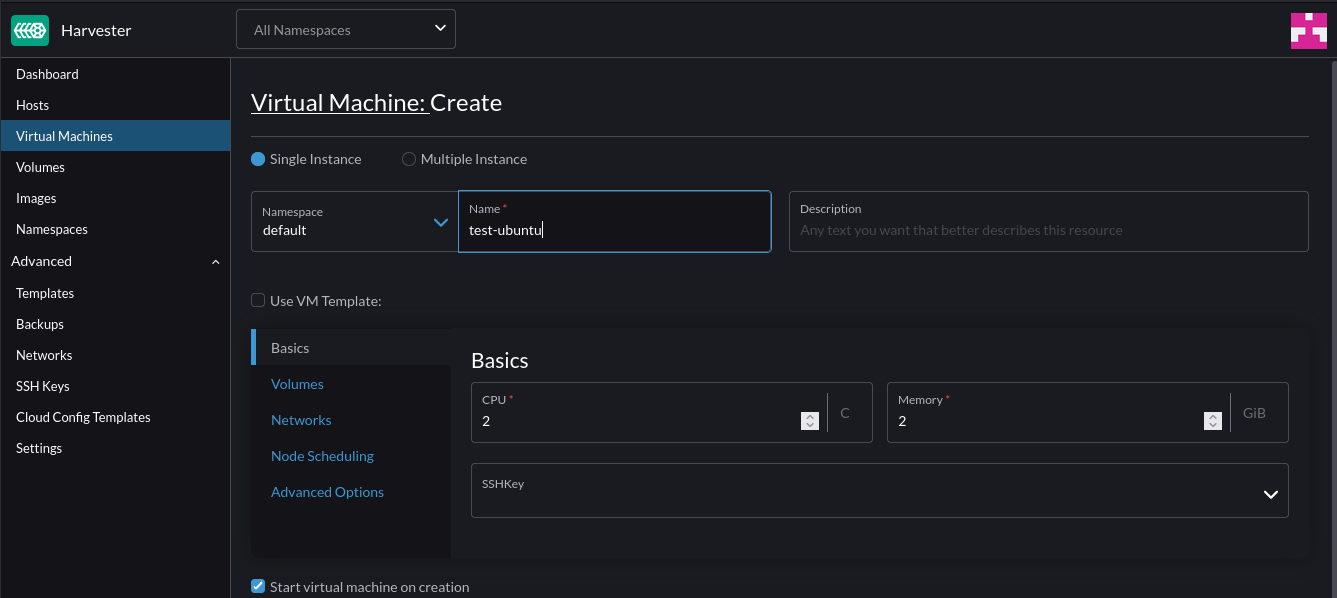
Specify the VM specs (CPU and Mem)

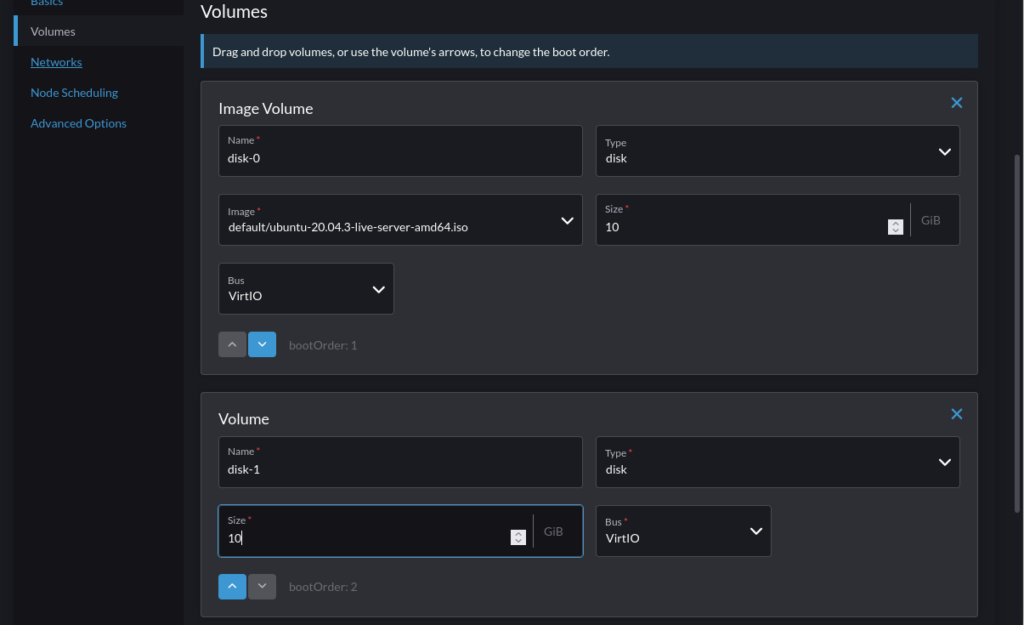
Under Volumes, add an additional volume to act as the installation target for the OS (Or leave if purely wanting to use a live ISO):

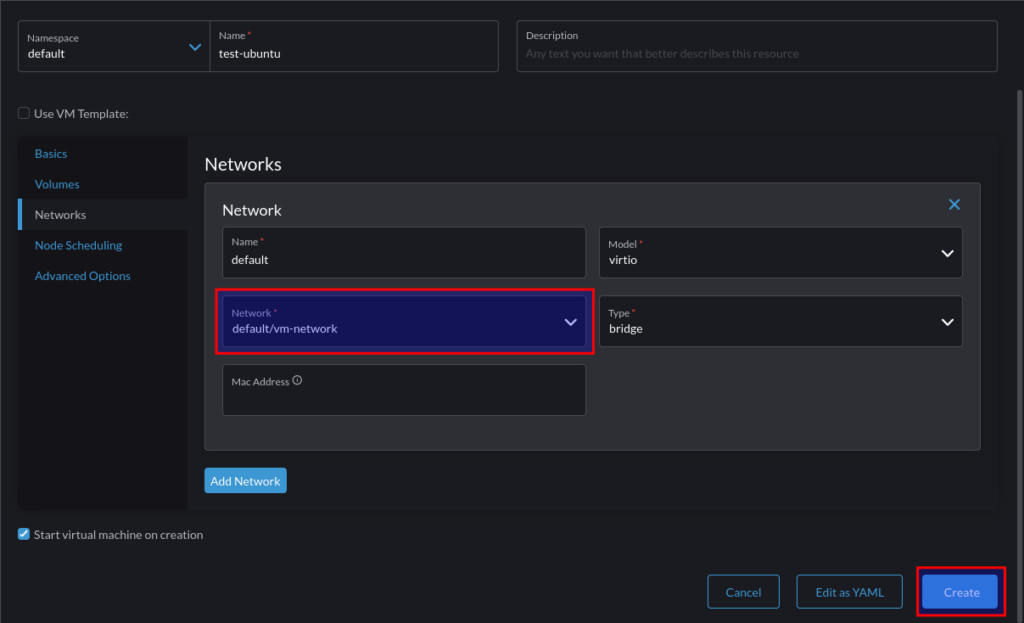
Under Networks, change the selection to the VM network that was previously created and click “Create”:

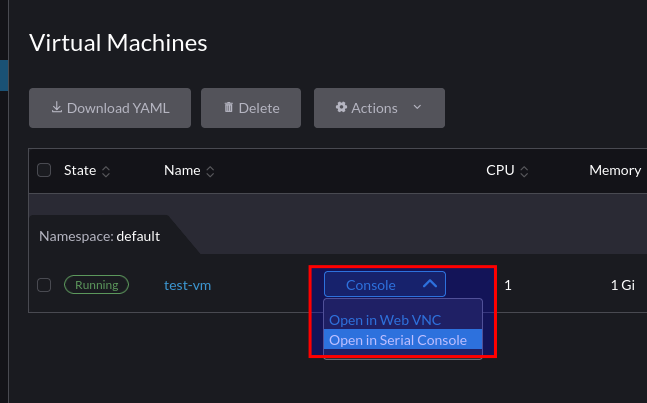
Once the VM is in running state, we can take a VNC console to it:

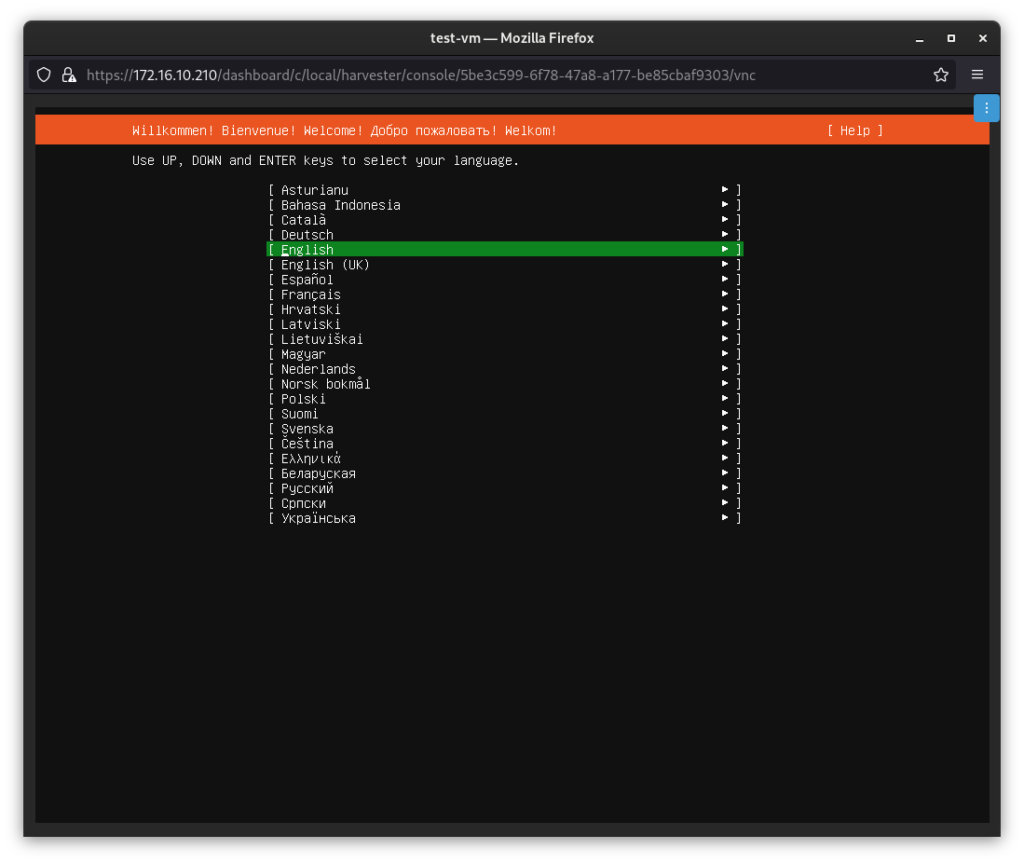
At which point we can interact with it as we would expect with any HCI solution:

Creating Kubernetes Clusters with Rancher and Pulumi

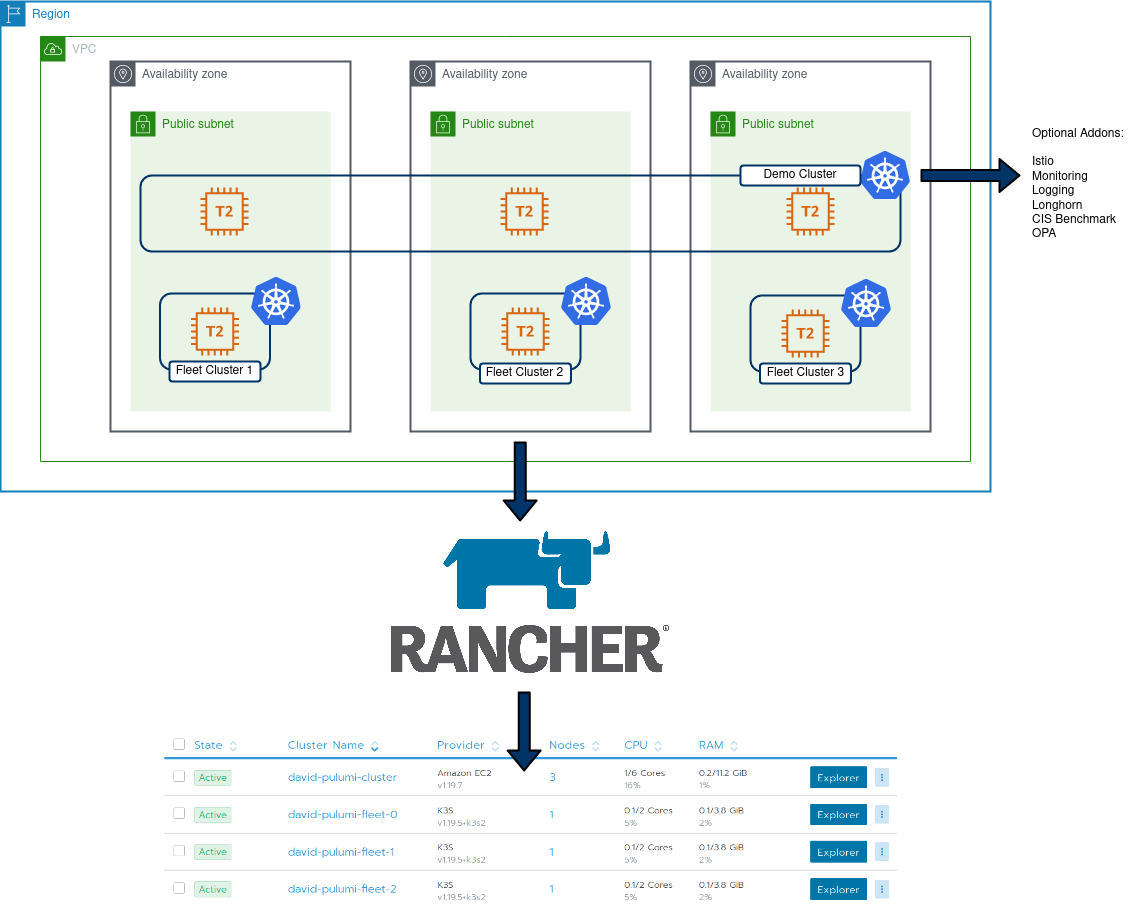
tldr; Here is the code repo

Intro

My Job at Suse (via Rancher) involves hosting a lot of demos, product walk-throughs and various other activities that necessitate spinning up tailored environments on-demand. To facilitate this, I previously leaned towards Terraform, and have since curated a list of individual scripts I have to manage on an individual basis as they address a specific use case.

This approach reached a point where it became difficult to manage. Ideally, I wanted an IaC environment that catered for:

  • Easy, in-code looping (ie for and range)
  • “Proper” condition handling, ie if monitoring == true, install monitoring vs the slightly awkward HCL equivalent of repurposing count as a sudo-replacement for condition handling.
  • Influence what’s installed by config options/vars.
  • Complete end-to end creation of cluster objects, in my example, create:
    • AWS EC2 VPC
    • AWS Subnets
    • AWS AZ’s
    • AWS IGW
    • AWS Security Group
    • 1x Rancher provisioned EC2 cluster
    • 3x single node K3S clusters used for Fleet
Architectural Overview

Pulumi addresses these requirements pretty comprehensively. Additionally, I can re-use existing logic from my Terraform code as the Rancher2 Pulumi provider is based on the Terraform implementation, but I can leverage Go tools/features to build my environment.

Code Tour – Core

The core objects are created directly, using types from the Pulumi packages:

VPC:

// Create AWS VPC
vpc, err := ec2.NewVpc(ctx, "david-pulumi-vpc", &ec2.VpcArgs{
	CidrBlock:          pulumi.String("10.0.0.0/16"),
	Tags:               pulumi.StringMap{"Name": pulumi.String("david-pulumi-vpc")},
	EnableDnsHostnames: pulumi.Bool(true),
	EnableDnsSupport:   pulumi.Bool(true),
})

You will notice some interesting types in the above – such as pulumi.Bool and pulumi.String. The reason for this is, we need to treat cloud deployments as asynchronous operations. Some values we will know at runtime (expose port 80), some will only be known at runtime (the ID of a VPC, as below). These Pulumi types are a facilitator of this asynchronous paradigm.

IGW

// Create IGW
igw, err := ec2.NewInternetGateway(ctx, "david-pulumi-gw", &ec2.InternetGatewayArgs{
	VpcId: vpc.ID(),
})

Moving to something slightly more complex, such as looping around regions and assigning a subnet to each:

// Get the list of AZ's for the defined region
azState := "available"
zoneList, err := aws.GetAvailabilityZones(ctx, &aws.GetAvailabilityZonesArgs{
	State: &azState,
})

if err != nil {
	return err
}

//How many AZ's to spread nodes across. Default to 3.
zoneNumber := 3
zones := []string{"a", "b", "c"}

var subnets []*ec2.Subnet

// Iterate through the AZ's for the VPC and create a subnet in each
for i := 0; i < zoneNumber; i++ {
	subnet, err := ec2.NewSubnet(ctx, "david-pulumi-subnet-"+strconv.Itoa(i), &ec2.SubnetArgs{
		AvailabilityZone:    pulumi.String(zoneList.Names[i]),
		Tags:                pulumi.StringMap{"Name": pulumi.String("david-pulumi-subnet-" + strconv.Itoa(i))},
		VpcId:               vpc.ID(),
		CidrBlock:           pulumi.String("10.0." + strconv.Itoa(i) + ".0/24"),
		MapPublicIpOnLaunch: pulumi.Bool(true),
	})

This is repeated for each type

Code Tour – Config

The config file allows us to store information required by providers (unless using env variables or something externally) and values that we can use to influence the resources that are created. In particular, I added the following boolean values:

config:
  Rancher-Demo-Env:installCIS: false
  Rancher-Demo-Env:installIstio: false
  Rancher-Demo-Env:installLogging: false
  Rancher-Demo-Env:installLonghorn: false
  Rancher-Demo-Env:installMonitoring: false
  Rancher-Demo-Env:installOPA: false
  Rancher-Demo-Env:installFleetClusters: false

This directly influence what will be created in my main demo cluster, as well as individual “Fleet” clusters. Within the main Pulumi code, these values are extracted:

conf := config.New(ctx, "")
InstallIstio := conf.GetBool("installIstio")
installOPA := conf.GetBool("installOPA")
installCIS := conf.GetBool("installCIS")
installLogging := conf.GetBool("installLogging")
installLonghorn := conf.GetBool("installLonghorn")
installMonitoring := conf.GetBool("installMonitoring")
installFleetClusters := conf.GetBool("installFleetClusters")

Because of this, native condition handling can be leveraged to influence what’s created:

if installIstio {
	_, err := rancher2.NewAppV2(ctx, "istio", &rancher2.AppV2Args{
		ChartName:    pulumi.String("rancher-istio"),
		ClusterId:    cluster.ID(),
		Namespace:    pulumi.String("istio-system"),
		RepoName:     pulumi.String("rancher-charts"),
		ChartVersion: pulumi.String("1.8.300"),
	}, pulumi.DependsOn([]pulumi.Resource{clusterSync}))

	if err != nil {
		return err
	}
}

As there’s a much more dynamic nature to this project, I have a single template which I can tailor to address a number of use-cases with a huge amount of customisation. One could argue the same could be done in Terraform with using count, but I find this method cleaner. In addition, my next step is to implement some testing using go’s native features to further enhance this project.

Bootstrapping K3s

One challenge I encountered was being able to create and import K3s clusters. Currently, only RKE clusters can be directly created from Rancher. To address this, I created the cluster object in Rancher, extract the join command, and passed it together with the K3s install script so after K3s has stood up, it will run the join command:

if installFleetClusters {
	// create some EC2 instances to install K3s on:
	for i := 0; i < 3; i++ {
		cluster, _ := rancher2.NewCluster(ctx, "david-pulumi-fleet-"+strconv.Itoa(i), &rancher2.ClusterArgs{
			Name: pulumi.String("david-pulumi-fleet-" + strconv.Itoa(i)),
		})

		joincommand := cluster.ClusterRegistrationToken.Command().ApplyString(func(command *string) string {
			getPublicIP := "IP=$(curl -H \"X-aws-ec2-metadata-token: $TOKEN\" -v http://169.254.169.254/latest/meta-data/public-ipv4)"
			installK3s := "curl -sfL https://get.k3s.io | INSTALL_K3S_VERSION=v1.19.5+k3s2 INSTALL_K3S_EXEC=\"--node-external-ip $IP\" sh -"
			nodecommand := fmt.Sprintf("#!/bin/bash\n%s\n%s\n%s", getPublicIP, installK3s, *command)
			return nodecommand
		})

		_, err = ec2.NewInstance(ctx, "david-pulumi-fleet-node-"+strconv.Itoa(i), &ec2.InstanceArgs{
			Ami:                 pulumi.String("ami-0ff4c8fb495a5a50d"),
			InstanceType:        pulumi.String("t2.medium"),
			KeyName:             pulumi.String("davidh-keypair"),
			VpcSecurityGroupIds: pulumi.StringArray{sg.ID()},
			UserData:            joincommand,
			SubnetId:            subnets[i].ID(),
		})

		if err != nil {
			return err
		}
	}

}

End result:

     Type                               Name                                  Status       
 +   pulumi:pulumi:Stack                Rancher-Demo-Env-dev                  creating...  
 +   pulumi:pulumi:Stack                Rancher-Demo-Env-dev                  creating..   
 +   pulumi:pulumi:Stack                Rancher-Demo-Env-dev                  creating..   
 +   ├─ rancher2:index:Cluster          david-pulumi-fleet-1                  created      
 +   ├─ rancher2:index:Cluster          david-pulumi-fleet-2                  created      
 +   ├─ rancher2:index:CloudCredential  david-pulumi-cloudcredential          created      
 +   ├─ aws:ec2:Subnet                  david-pulumi-subnet-1                 created      
 +   ├─ aws:ec2:Subnet                  david-pulumi-subnet-0                 created      
 +   ├─ aws:ec2:InternetGateway         david-pulumi-gw                       created     
 +   ├─ aws:ec2:Subnet                  david-pulumi-subnet-2                 created     
 +   ├─ aws:ec2:SecurityGroup           david-pulumi-sg                       created     
 +   ├─ aws:ec2:DefaultRouteTable       david-pulumi-routetable               created     
 +   ├─ rancher2:index:NodeTemplate     david-pulumi-nodetemplate-eu-west-2b  created     
 +   ├─ rancher2:index:NodeTemplate     david-pulumi-nodetemplate-eu-west-2a  created     
 +   ├─ rancher2:index:NodeTemplate     david-pulumi-nodetemplate-eu-west-2c  created     
 +   ├─ aws:ec2:Instance                david-pulumi-fleet-node-0             created     
 +   ├─ aws:ec2:Instance                david-pulumi-fleet-node-2             created     
 +   ├─ aws:ec2:Instance                david-pulumi-fleet-node-1             created     
 +   ├─ rancher2:index:Cluster          david-pulumi-cluster                  created     
 +   ├─ rancher2:index:NodePool         david-pulumi-nodepool-2               created     
 +   ├─ rancher2:index:NodePool         david-pulumi-nodepool-1               created     
 +   ├─ rancher2:index:NodePool         david-pulumi-nodepool-0               created     
 +   ├─ rancher2:index:ClusterSync      david-clustersync                     created     
 +   ├─ rancher2:index:AppV2            opa                                   created     
 +   ├─ rancher2:index:AppV2            monitoring                            created     
 +   ├─ rancher2:index:AppV2            istio                                 created     
 +   ├─ rancher2:index:AppV2            cis                                   created     
 +   ├─ rancher2:index:AppV2            logging                               created     
 +   └─ rancher2:index:AppV2            longhorn                              created     
 
Resources:
    + 29 created

Duration: 19m18s

20mins for a to create all of these resources fully automated is pretty handy. This example also includes all the addons – opa, monitoring, istio, cis, logging and longhorn.

« Older posts Newer posts »

© 2025 Virtual Thoughts

Theme by Anders NorenUp ↑

Social media & sharing icons powered by UltimatelySocial
RSS
Twitter
Visit Us
Follow Me