Virtualisation, Storage and various other ramblings.

Author: David (Page 2 of 24)

Replicating my vSphere network configuration in Openshift Virtualisation

Red Hat Openshift Virtualisation provides a platform for running and managing Virtual Machines alongside Containers using a consistent API. It also provides a mechanism for migrating VMs from platforms such as vSphere.

As I have both environments, I wanted to deploy an Openshift Virtualisation setup that mimics my current vSphere setup so I could migrate Virtual Machines to it.

Existing vSphere Design

Below is a diagram depicting my current vSphere setup. My ESXi hosts are dual-homed with a separation of management (vmkernel) and virtual machine traffic.

vmnic1 is connected to a trunk port accommodating several different VLANs. These are configured as corresponding port groups in the Distributed Switch.

Integrating an Openshift Virtualisation host

Given an Openshift host with the same number of NICs, we can design a similar solution including a test use case:

By default, an existing bridge (ovs-system) is created by Openshift to facilitate cluster networking. To achieve the same level of isolation configured in the vSphere environment, an additional bridge is required. This will be called vlan-trunk and as the name implies, it will act as a trunk interface for a range of VLAN networks.

Once configured, a Virtual Machine Instance can be created, connected to one of these VLAN networks and reside on the same L2 network as their vSphere-managed VM counterparts.

Configuring the Openshift Node

There are several ways to accomplish this, however for ease, the NMState Operator can be used to configure host networking in a declarative way:

Once installed, a default NMState object needs to be created:

apiVersion: nmstate.io/v1
kind: NMState
metadata:
  name: nmstate
spec: {}

After which we can define an instance of the NodeNetworkConfigurationPolicy object that creates our additional bridge interface and includes a specific NIC.

apiVersion: nmstate.io/v1
kind: NodeNetworkConfigurationPolicy
metadata:
  name: vlan-trunk-ens34-policy
spec:
  desiredState:
    interfaces:
      - name: vlan-trunk
        description: Linux bridge with ens34 as a port
        type: linux-bridge
        state: up
        ipv4:
          enabled: false
        bridge:
          options:
            stp:
              enabled: false
          port:
            - name: ens34

To validate, run ip addr show on the host:

2: ens33: <BROADCAST,MULTICAST,ALLMULTI,UP,LOWER_UP> mtu 1500 qdisc mq master ovs-system state UP group default qlen 1000
    link/ether 00:50:56:bb:e3:c3 brd ff:ff:ff:ff:ff:ff
    altname enp2s1
3: ens34: <BROADCAST,MULTICAST,UP,LOWER_UP> mtu 1500 qdisc mq master vlan-trunk state UP group default qlen 1000
    link/ether 00:50:56:bb:97:0d brd ff:ff:ff:ff:ff:ff
    altname enp2s2

...

653: vlan-trunk: <BROADCAST,MULTICAST,UP,LOWER_UP> mtu 1500 qdisc noqueue state UP group default qlen 1000
    link/ether 00:50:56:bb:97:0d brd ff:ff:ff:ff:ff:ff

In a similar way that Distributed Port groups are created in vSphere, we can create NetworkAttachmentDefinition objects that represent our physical network(s) in software.

The example below is comparable to a Distributed Port Group in vSphere that’s configured to tag traffic with the VLAN ID of 40. If required, we could repeat this process for each VLAN/Distributed Port group so we have a 1:1 mapping between both the vSphere and Openshift Virtualisation environments.

apiVersion: k8s.cni.cncf.io/v1
kind: NetworkAttachmentDefinition
metadata:
  annotations:
    k8s.v1.cni.cncf.io/resourceName: bridge.network.kubevirt.io/vlan-trunk
  name: vm-vlan-40
  namespace: openshift-nmstate
spec:
  config: '{"name":"vm-vlan-40","type":"cnv-bridge","cniVersion":"0.3.1","bridge":"vlan-trunk","vlan":40,"macspoofchk":true,"ipam":{},"preserveDefaultVlan":false}'

Which can be referenced when creating a VM:

After a short period, the VM’s IP address will be reported to the console. In my example, I have a DHCP server running on that VLAN, which is how this VM acquired its IP address:

Which we can test connectivity from another machine with ping. such as a VM running on an ESXi Host:

sh-5.1# ping 172.16.40.4
PING 172.16.40.4 (172.16.40.4) 56(84) bytes of data.
64 bytes from 172.16.40.4: icmp_seq=1 ttl=63 time=1.42 ms
64 bytes from 172.16.40.4: icmp_seq=2 ttl=63 time=0.960 ms
64 bytes from 172.16.40.4: icmp_seq=3 ttl=63 time=0.842 ms
64 bytes from 172.16.40.4: icmp_seq=4 ttl=63 time=0.967 ms
64 bytes from 172.16.40.4: icmp_seq=5 ttl=63 time=0.977 ms

By taking this approach, we can gradually start migrating VM’s from vSphere to Openshift Virtualisation with minimal disruption, which I will cover in a subsequent post.

Diving into an eBPF + Go Example: Part 3 (Bonus Round)

Part 1 / Part 2 / Part 3

With one example explored, I wanted to put a spin on it – Therefore, I had an idea:

“Can I use eBPF to identify and store the contents of the protocol header for IP packets on a specific interface?”

It’s more of a rhetorical question – of course we can! The code can be found here.

To summarise, the eBPF C program is a little more complicated. It still leverages XDP, however instead of counting the number of packets, it will inspect each IP packet, extract the protocol number, and store it in a map.

#include <linux/bpf.h>
#include <bpf/bpf_helpers.h>
#include <linux/if_ether.h>
#include <linux/ip.h>

struct {
    __uint(type, BPF_MAP_TYPE_ARRAY); 
    __type(key, __u32);
    __type(value, __u64);
    __uint(max_entries, 255);
} protocol_count SEC(".maps"); 


SEC("xdp")
int get_packet_protocol(struct xdp_md *ctx) {
    void *data_end = (void *)(long)ctx->data_end;
    void *data = (void *)(long)ctx->data;

    // Parse Ethernet header
    struct ethhdr *eth = data;
    if ((void *)(eth + 1) > data_end) {
        return XDP_PASS;
    }

    // Check if the packet is an IP packet
    if (eth->h_proto != __constant_htons(ETH_P_IP)) {
        return XDP_PASS;
    }

    // Parse IP header
    struct iphdr *ip = data + sizeof(struct ethhdr);
    if ((void *)(ip + 1) > data_end) {
        return XDP_PASS;
    }
    
    __u32 key = ip->protocol; // Using IP protocol as the key
    __u64 *count = bpf_map_lookup_elem(&protocol_count, &key);
    if (count) {
        __sync_fetch_and_add(count, 1);
    }

    return XDP_PASS;
}

The Go application is over 100 lines, therefore for brevity, it can be viewed here.

The eBPF map to store this could be visualised as:

+----------------------------------------------------+
|                 eBPF Array Map                      |
|                                                    |
|  +------+  +------+  +------+  +------+  +------+  |
|  |  0   |  |  1   |  |  2   |  |  ... |  | 254  |  |
|  |------|  |------|  |------|  |------|  |------|  |
|  |  ?   |  |  ?   |  |  ?   |  |  ... |  |  ?   |  |
|  +------+  +------+  +------+  +------+  +------+  |
|                                                    |
+----------------------------------------------------+

Where the Key represents the IP protocol number and value counting the number of instances.

The Go application leverages a helper function to map the protocol number to name in stdout.

Running the application probes the map and outputs non-zero values and their corresponding key. It can be easily tested by running the app and generating traffic. Note how after executing ping the map updates with ICMP traffic.

Part 1 / Part 2 / Part 3

Diving into an eBPF + Go Example: Part 1

Part 1 / Part 2 / Part 3

Preamble: In preparation for writing this I looked at some excellent content created by Liz Rice and Daniel Finneran – including videos, code and literature. I highly recommend checking out their work.

The Cilium eBPF documentation has some excellent examples of getting started with eBPF and Go. As a “hobbyist” programmer, I wanted to cement some of these concepts by digging deeper into one of the examples. Part of my learning style is to compile my own notes on a given topic, and this post is essentially that.

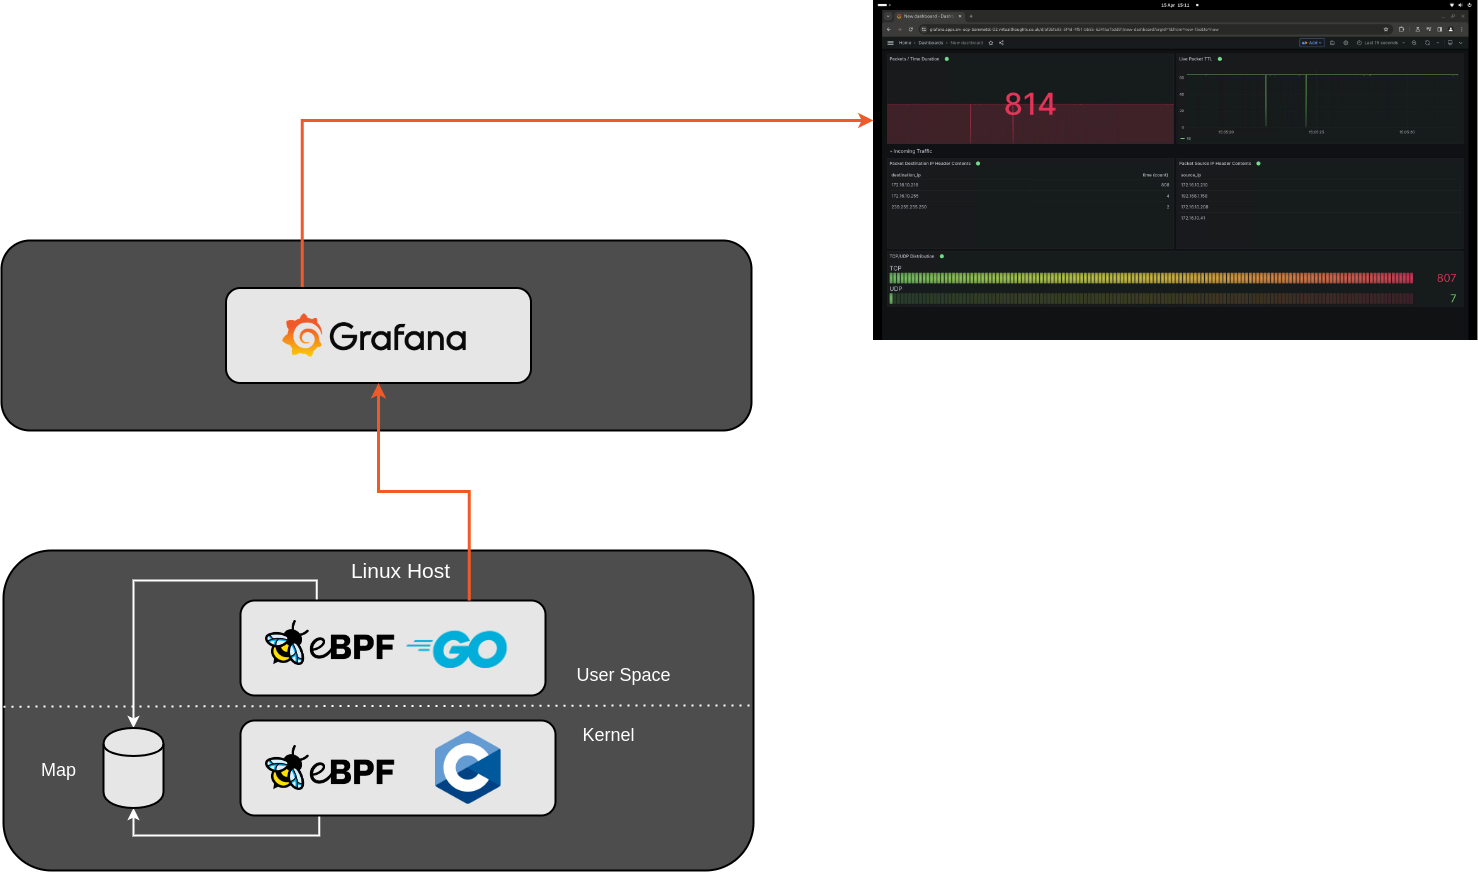
I’ve split this post into three sections – This (the first) covers compiling the C portion of an app to eBPF bytecode, the second part creating the complementary userspace application (in Go) that loads this eBPF program, in conjunction with interacting with a shared map. Lastly, a slightly different application digging a bit deeper into packet processing.

https://ebpf.io/static/1a1bb6f1e64b1ad5597f57dc17cf1350/6515f/go.png
Source: https://ebpf.io/what-is-ebpf/

There’s an example eBPF C program from the ebpf-go.dev docs, which contains the following:

//go:build ignore

#include <linux/bpf.h>
#include <bpf/bpf_helpers.h>

struct {
    __uint(type, BPF_MAP_TYPE_ARRAY); 
    __type(key, __u32);
    __type(value, __u64);
    __uint(max_entries, 1);
} pkt_count SEC(".maps"); 

// count_packets atomically increases a packet counter on every invocation.
SEC("xdp") 
int count_packets() {
    __u32 key    = 0; 
    __u64 *count = bpf_map_lookup_elem(&pkt_count, &key); 
    if (count) { 
        __sync_fetch_and_add(count, 1); 
    }

    return XDP_PASS; 
}

char __license[] SEC("license") = "Dual MIT/GPL";

This is what we need to compile into eBPF bytecode. Let’s break it down, starting from the struct definition, which defines our map:

struct {
    __uint(type, BPF_MAP_TYPE_ARRAY); 
    __type(key, __u32);
    __type(value, __u64);
    __uint(max_entries, 1);
} pkt_count SEC(".maps"); 

We could visually represent this as:

+----------------------------------------+
|          eBPF Array Map                |
|         (pkt_count Map)                |
+----------------------------------------+
|                                        |
|  Index  | Key (__u32) | Value (__u64)  |
|----------------------------------------|
|    0    |      0      |  0x0000        |
|         |             |                |
+----------------------------------------+

We can think of BPF_MAP_TYPE_ARRAY as a generic array of key-value storage with a fixed number of rows (indexes).

eBPF has multiple map types:

enum bpf_map_type {
	BPF_MAP_TYPE_UNSPEC,
	BPF_MAP_TYPE_HASH,
	BPF_MAP_TYPE_ARRAY,
	BPF_MAP_TYPE_PROG_ARRAY,
	BPF_MAP_TYPE_PERF_EVENT_ARRAY,
	BPF_MAP_TYPE_PERCPU_HASH,
	BPF_MAP_TYPE_PERCPU_ARRAY,
	BPF_MAP_TYPE_STACK_TRACE,
	BPF_MAP_TYPE_CGROUP_ARRAY,
	BPF_MAP_TYPE_LRU_HASH,
	BPF_MAP_TYPE_LRU_PERCPU_HASH,
	BPF_MAP_TYPE_LPM_TRIE,
	BPF_MAP_TYPE_ARRAY_OF_MAPS,
	BPF_MAP_TYPE_HASH_OF_MAPS,
	BPF_MAP_TYPE_DEVMAP,
	BPF_MAP_TYPE_SOCKMAP,
....

Which map type used will influence its structure. As such, different map types are more suited for storing certain types of information.

As per the kernel docs, the key is an unsigned 32-bit integer.

value can be of any size. For this example, we use an unsigned 64-bit integer. We’re only counting a single, specific metric, therefore we can limit this map to a single index.

At the end of the struct, we define:

pkt_count SEC(".maps");

pkt_count is the name of the structure that defines the eBPF map. This name is used as a reference in the eBPF program to interact with it, such as retrieving information.

SEC(".maps"); Is a Macro used to define a section name for the given object in the resulting ELF file. This instructs the compiler to include the pkt_count structure to be placed in the ELF section called .maps

SEC("xdp") 
int count_packets() {
}

The SEC("xdp") macro specifies that the function proceeding it (count_packets) is to be placed in the ELF section named xdp. This is effectively associating our code to a specific kernel hook.

This ELF section is used by the eBPF loader to recognise that this function is an XDP eBPF program. There are other program types other than XDP, for example, Kprobe, Uprobe, Tracepoint. Which we choose depends on what we want to accomplish. XDP is predominantly used with high-performance packet processing, and as we’re counting the number of packets, it’s ideal for this use case.

Expanding the function body:

SEC("xdp") 
int count_packets() {
    __u32 key    = 0; 
    __u64 *count = bpf_map_lookup_elem(&pkt_count, &key); 
    if (count) { 
        __sync_fetch_and_add(count, 1); 
    }

    return XDP_PASS; 
}

__u32 key = 0; defines a local variable of key that we use to access the eBPF map entry. As our map only has 1 entry, we know we can reference this with a value of 0.

__u64 *count = bpf_map_lookup_elem(&pkt_count, &key); looks up an element in the pkt count map using the specified key. We’ll need this so we can increment it, which we do with:

   if (count) { 
        __sync_fetch_and_add(count, 1); 
    }

    return XDP_PASS; 

Why use __sync_fetch_and_add instead of standard incrementing?

In high-throughput environments like network packet processing, we often have multiple execution contexts (like different CPU cores) that might access and update eBPF maps concurrently. Therefore, we need to ensure atomic operations on these structures for correctness and prevent data races.

Lastly, we return an integer value from the xdp_action enum, in this case a pass, but we could return other values:

enum xdp_action {
	XDP_ABORTED = 0,
	XDP_DROP,
	XDP_PASS,
	XDP_TX,
	XDP_REDIRECT,
};

Next, let’s have a look at the user space application!

Part 1 / Part 2 / Part 3

« Older posts Newer posts »

© 2024 Virtual Thoughts

Theme by Anders NorenUp ↑

Social media & sharing icons powered by UltimatelySocial
RSS
Twitter
Visit Us
Follow Me